
Customer Invoicing & Payments
Odoo ERPOnline provides various features to keep track of your invoicing and payments. The simple workflow of invoicing, with efficient encoding of the payment process of your customers, makes Odoo ERPOnline more adoptable. In this section, we discuss two processes, the easy workflow for non-accountants who just want to keep track of their payments, and the complete accounting section. Note that only the customer process will be described, but of course Odoo ERPOnline offers equal invoicing and payment methods for suppliers.
In Odoo ERPOnline, the invoicing workflow is very simple. You can see it in the following figure:
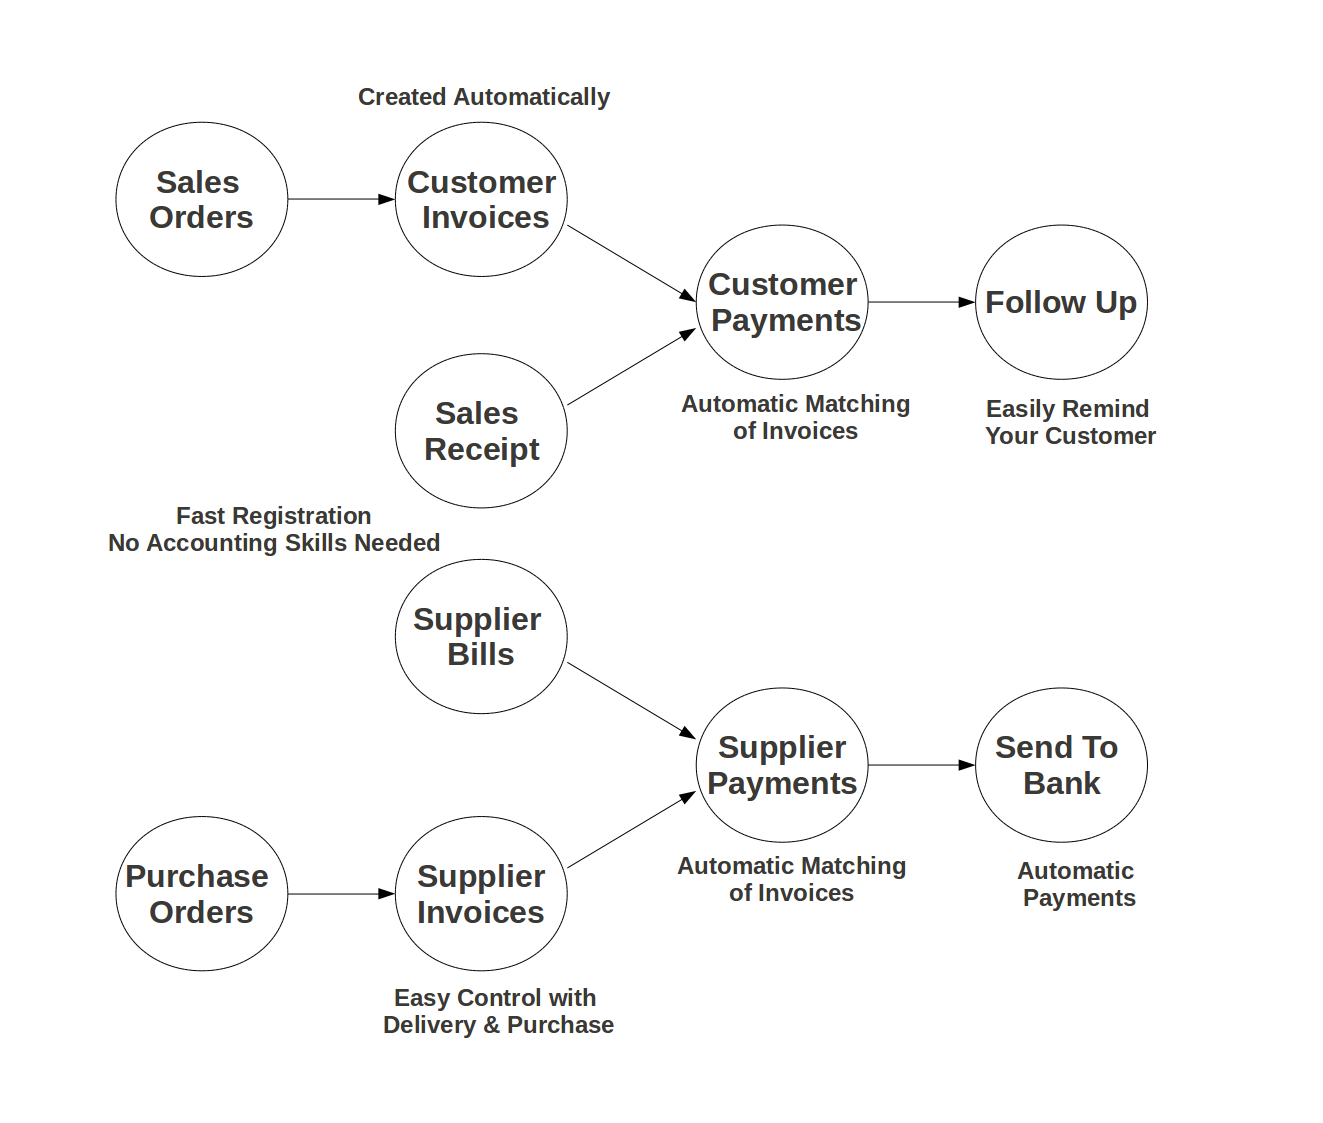
Invoicing Workflow
An invoice can be generated from various documents, such as a Sales Order and a Purchase Order, or at the time of confirming a shipment. These methods will be proposed when you use Odoo ERPOnline as a truely integrated system.
Of course, companies often work together with an external accountant who keeps their books. In that case, you would like to know which invoices exist and have been paid.
The specific and easy-to-use Invoicing system in Odoo ERPOnline allows you to keep track of your accounting, even when you are not an accountant. It provides an easy way to follow up your suppliers and customers. You could use this simplified accounting in case you work with an (external) account to keep your books, and you still want to keep track of payments. The Invoicing system includes receipts and vouchers (an easy way to keep track of sales and purchases). It also offers you an easy method to register payments, without you having to encode complete abstracts of account.
Simple Customer Receipts
When you sell products to a customer, you can give him a true invoice or a Sales Receipt, which is also called Customer Receipt. Sales Receipts are merely a kind of sales ticket and not a real invoice.
When the sales receipt is confirmed, Odoo ERPOnline creates journal items automatically and you can record the customer payment related to this sales receipt. The easy invoicing system does not require extensive accounting setup, so you will be up and running quickly!
You can create and modify a sales receipt from the menu Accounting > Customers > Sales Receipt.
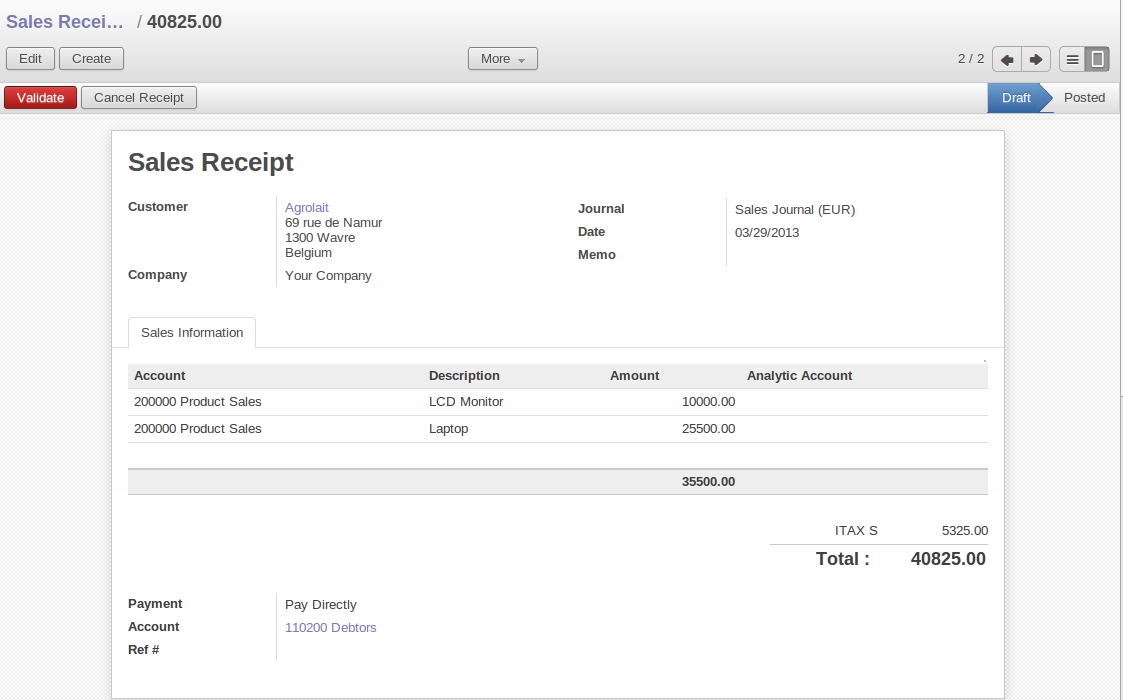
Defining a Customer Receipt
When you create a new Sales Receipt, you have to enter the Customer for whom you want to create a voucher. You can also define Sales Lines in the Sales Information tab. Here you have to define Account, Amount and Description. At the bottom of the form, you will have two options for Payment: one is Pay Directly and another is Pay Later or Group Funds. When you select the Pay Directly option, you have to enter the bank Account. The Total amount displays automatically with calculation of tax (if you select VAT to be added) when you click the Compute Tax button.
When you purchase products from a supplier, you will receive a Purchase Receipt (a ticket), which is also called Notes Payable in accounting terminology. When a purchase receipt is confirmed, it creates journal items automatically and you can record the supplier payment related to this purchase receipt, just like for the sales receipts.
You can create and modify the purchase receipt through the menu Accounting > Suppliers > Purchase Receipt.
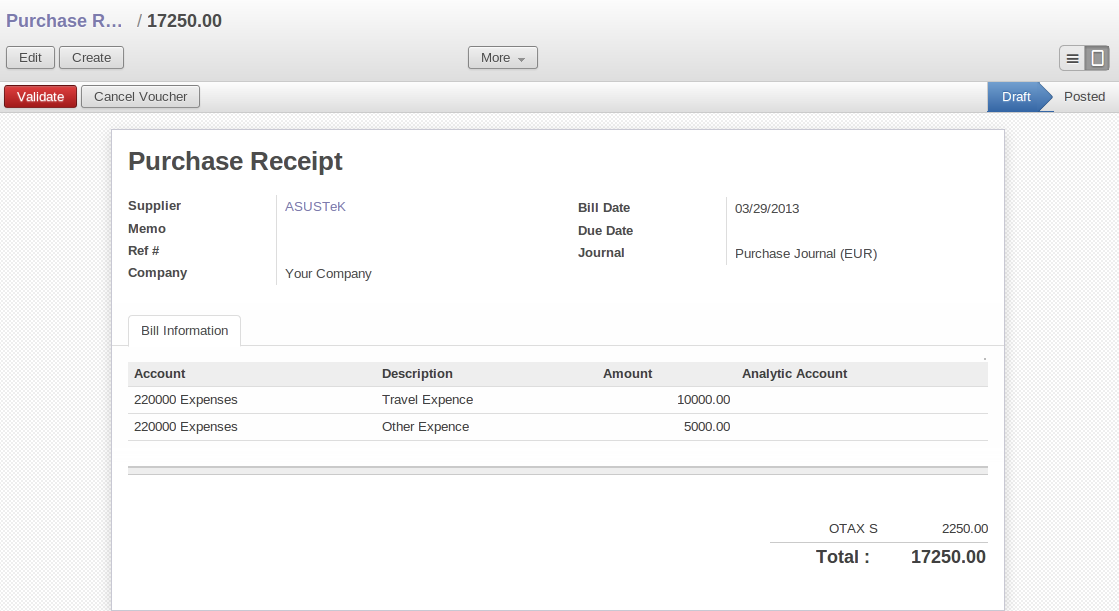
Purchase Receipt
The Purchase Receipt form looks like the Sales Receipt form. In this form, carefully select the journal.
Invoice your Customers
It is surprising to see that in the 21st century, most companies still process quotations & invoices manually, mostly by post or email. The trend is clearly for personal communication to disregard these legacy media, and replace them with instant messaging, social networks, etc. The Electronic Data Interchange (EDI) platform is here to try and open Odoo ERPOnline to more modern communication systems, where electronic documents are exchanged and synchronised between business partners in real-time.
Initially, Odoo ERPOnline will support a simple EDI mechanism for certain Odoo ERPOnline documents, such as Sales Orders, Purchase Orders and Invoices.
Indeed, the integrated email and invoicing system in Odoo ERPOnline allows you to create an invoice and automatically send an email with the invoice link to the customer.
The customer then has several options. If your customer also has an Odoo ERPOnline instance, he can easily import the invoice you have sent him, simply by clicking the link.
Below, you find an example of such an EDI flow:
- Your company issues a Sales Order, a Purchase Order or an Invoice for a specific partner, let's say Camptocamp.
- Partner Camptocamp receives an email with a link to an online preview of the document.
- In the online preview of the document, Camptocamp can read the document, download or print the PDF version, and then choose between a couple of options:
- Import this document in his own Odoo ERPOnline instance, simply by providing the instance address.
- Ask to create a new Odoo ERPOnline online instance, where the document will be pre-imported.
- Ask for the raw EDI document, which the partner can then import in his own third-party software through a corresponding EDI import system.
- Partner Camptocamp can also choose to directly pay online through Paypal or any other mechanism provided by your company.
The email notification is freely customisable as an Email Template from the Settings > Technical > Email > Templates.
To get the EDI and automatic emailing of orders and invoices to work, you need the EDI module, which is installed by default. You need to add an email address to the partner and make sure the Opt-out checkbox is not selected. Ask your system administrator to configure an Outgoing Mail Server. Note that email notifications will be added to a mail queue and processed once in a while, but you can force emails to be send directly from the Settings > Technical > Email > Messages.
The email your customer will receive, will look like the image displayed.
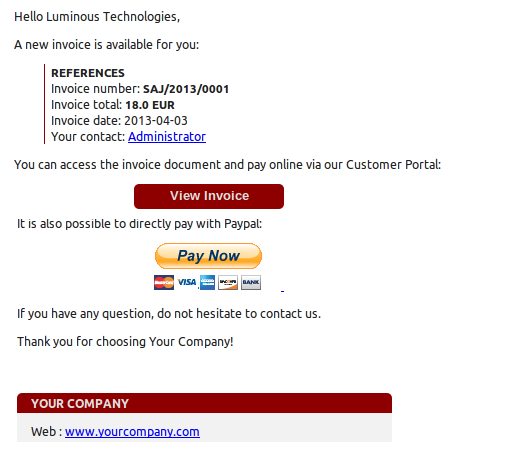
Mail to Your Customer
Keep Track of your Customer's Payments
It is important to efficiently keep track of payments of your customers and suppliers. People who have no accounting knowledge and just want to use Odoo ERPOnline to keep an eye on their payments, can set the Invoicing & Payments access rights from the User form.
Customer Payment allows you to register the payments you receive from your customers. In order to record a payment, you have to enter the customer, the payment method (= the journal) and the payment amount. Odoo ERPOnline will automatically propose the reconciliation of this payment with any open invoices or sales receipts, credit notes and (advance) payments.
You can register Customer payments in Odoo ERPOnline from the menu Accounting > Customers > Customer Payment click Create to register a payment.
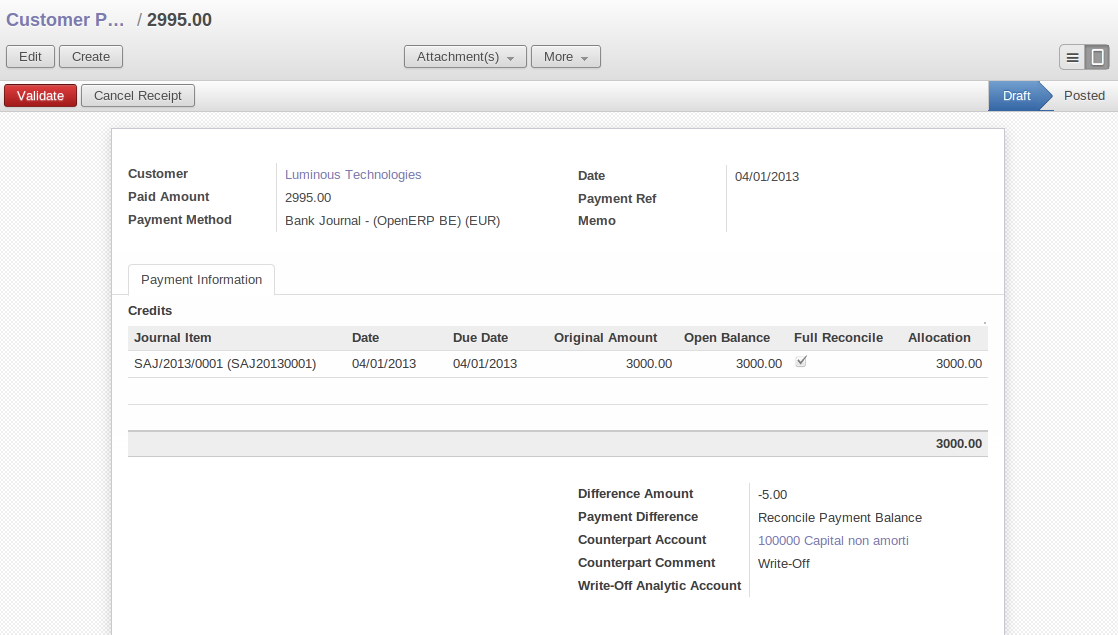
Customer Payment
Suppose you have an invoice of 3000 EUR; the amount you actually receive from the customer is 2995 EUR. You would consider the invoice as entirely paid. How would you proceed?
To create a new Customer Payment, select the customer, key in the Paid Amount, e.g. 2995 and select the Payment Method, i.e. your bank journal. Any open invoices, credit notes or advances for this partner will be displayed on the Payment Information tab. In this example, the 3000 EUR invoice will be proposed.
Now you have to tell Odoo ERPOnline that you want to consider the invoice as fully paid. Simply click the invoice line on the Payment Information tab to make it editable. Now select the Full Reconcile checkbox, and notice that the amount changes to the full amount of the invoice.
Select the proper option in the Payment Difference field, i.e. Reconcile Payment (you would use the Keep Open option if you want to claim the 5 EUR from the customer). The write-off amount is already proposed automatically, but you have to enter the Counterpart Account so that write-off entries can be generated by Odoo ERPOnline. You can also enter a comment about the reconciliation (by default, Write-Off will be proposed). Then post your payment.
When you do analytic bookkeeping as well, you can enter an analytic account for the write-off too.
This easy payment system also allows you to post a payment that you cannot directly attribute to a customer as an advance.
Let us take the following example. A customer has two open invoices, one of 2000, one of 1500. He pays 1000, but you cannot assign this to any of the two invoices directly. You can just enter this payment as an advance. How do you proceed?
When you key in an Amount paid of 1000 in your Customer Payment, the amount will be attributed to the oldest invoice. You do not want this, because you have no idea yet of what invoice the amount should be linked to. Click the amount in the first line and set it to 0. Validate the payment. The system will now create an advance payment of 1000 for the customer concerned.
The Supplier Payment form allows you to track the payment to your suppliers in the same way as a customer payment. From the menu Accounting > Suppliers > Supplier Payment, click the Create button to create a new Supplier Payment.
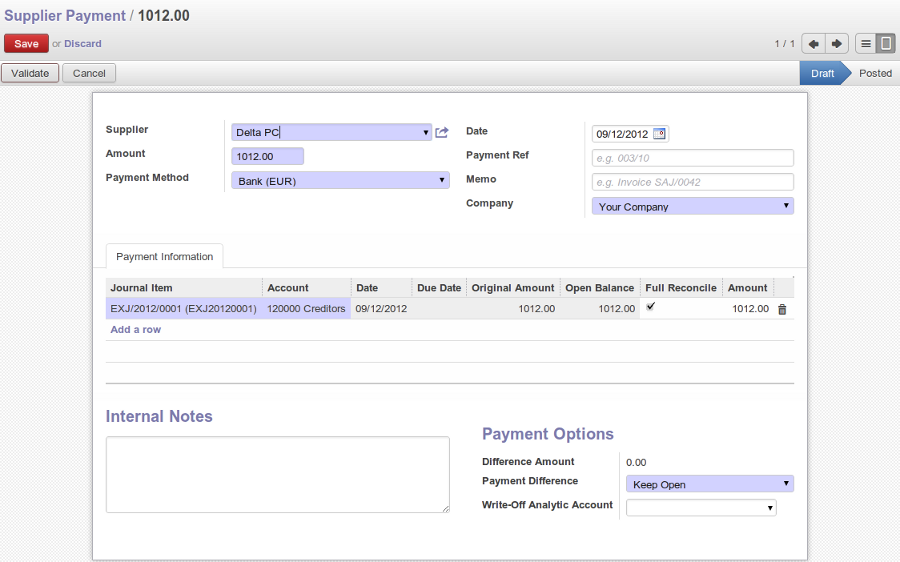
Supplier Payment Form
Another way of keeping track of your payments is the way accountants will do it, by encoding Bank Statements. You can also push your accounting further by importing your payments electronically through a CODA file you receive from the bank. To do this install the l10n_be_coda module.
How should you proceed?
You have to enter your company's bank account(s) for which you want to accept CODA files. Go to the menu Accounting > Configuration > Accounts > Setup your Bank Accounts. Choose the bank account type you want to use (IBAN or normal bank account). For electronic payments, you should use IBAN; do not forget to also enter your bank's BIC code.
Bank Journal
When you save the bank account through the Setup your Bank Accounts wizard, a bank journal will be automatically created for that account.
Then add the bank account details for each partner that will pay you through a bank. You can do this in the Partner form, on the Accounting tab.
Download the CODA file from your bank to any directory. Import the electronic bank statement through the menu Accounting > Bank and Cash > Import CODA File.
Enter the data required in the wizard . Then select the CODA file in your directory and click the Import button to start processing the CODA file.
Odoo ERPOnline will then import a draft bank statement in the selected journal and will match all corresponding customer / supplier payments when possible. You can change the draft statement if necessary from the menu Accounting > Bank and Cash > Bank Statements.