
Accounting Entries
Various methods can be used to create accounting entries. You have already seen how an invoice creates its own entries, for example.
This section deals with
- Managing bank statements.
- Managing cash.
- Manual journal entries.
Here we will show you how to enter financial transactions. In Odoo ERPOnline, you can handle bank statements and also a cash register. Use different journals for these two kinds of transaction. According to the journal type selected, you will have a different screen.For more information about creating journals, refer to the Configuring Accounts from A to Z chapter.
Managing Bank Statements
Odoo ERPOnline provides a visual tool for managing bank statements that simplifies data entry into accounts. As soon as a statement is validated, the corresponding accounting entries are automatically generated by Odoo ERPOnline. So non-accounting people can enter financial transactions without having to worry about things such as credit, debit and counterparts.
To enter a bank statement, go to the menu Accounting > Bank and Cash > Bank Statements.

Data Entry Form for a Bank Statement
The statement reference Name and the Date are automatically suggested by Odoo ERPOnline. The Name will be filled with the statement number at confirmation of the bank statement. You can configure your own reference by managing sequences in the Settings > Technical > Sequences & Identifiers > Sequences menu.
Then select the correct Journal. Ideally, when you are configuring your company, you would create at least one journal for each bank account and one journal for petty cash in your company. So select the journal corresponding to the bank account whose statement you are handling.
The currency that you are using for the statement line is that of the selected journal. If you are entering statement lines for an account in American Dollars (USD), the amounts must be entered in USD . The currency is automatically converted into the company's main currency when you confirm the entry, using the rates in effect at the date of entry. (This means that you would need valid currency conversion rates to be created first. Go to Accounting > Configuration > Miscellaneous > Currencies menu.)
Odoo ERPOnline automatically completes the initial balance based on the closing balance of the preceding statement. You can modify this value and force another value. This lets you enter statements in the order of your choice. Also if you have lost a page of your statement, you can enter the following ones immediately and you are not forced to wait for a duplicate from the bank.
So, complete the closing balance which corresponds to the new value in the account displayed on your bank statement. This amount will be used to control the operations before approving the statement.
Then you must enter all the lines on the statement. Each line corresponds to a banking transaction.
Enter the transaction line. You have two ways of entering financial transactions: manually or through the Import Invoices button.
Manual Entry
When you type the Partner name, Odoo ERPOnline automatically proposes the corresponding centralisation account. The total amount due for the customer or supplier is pre-completed (Amount). This gives you a simple indication of the effective payment. You must then enter the amount that appears on your statement line: a negative sign for a withdrawal and a positive sign for a cash payment or deposit.
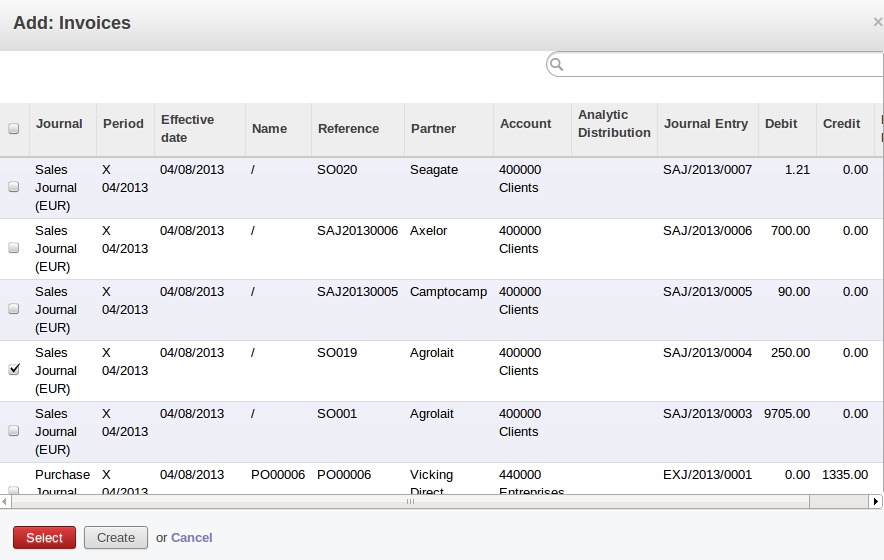
Import Invoices
Click the Import Invoices button, then click Add to select the invoices for which your payment will have to be reconciled. Click select to confirm your selection; the statement line will automatically be added with the corresponding reconciliation.
Reconciliation from Data Entry of the Bank Statement
Other methods of reconciliation are possible: from accounting entries, when saving the payment directly on an invoice, or using the automatic reconciliation tool.
You can carry out either a full or a partial reconciliation. If you see a difference between the payment and the invoices to reconcile, you can enter the difference in the second part of the form Write-off. You have to set an account for the adjustment. The main reasons explaining the difference are usually:
- Profit or Loss.
- Exchange differences.
- Discounts given for fast payment.
When the reconciliation is complete - that is, the payment is equal to the sum of the due payments and the adjustments - you can close the reconciliation form.
The reconciliation operation is optional – you could very well do it later or not do it at all. However, reconciliation has got two significant effects:
- Marking that the invoices have been paid.
- Preventing the payment and invoice amounts from appearing on customer reminder letters. Unless you have reconciled them, a customer will see the invoice and payment amounts on his reminder letter (which will not alter the balance due since they will just cancel each other out).
Finally, once you have entered the complete bank statement, you can validate it. Odoo ERPOnline then automatically generates the corresponding accounting entries if the calculated balance equals the final balance, indicated in the Closing Balance field. The reconciled invoices are marked as paid at that point.
You can also enter general accounting entries, for example, banking costs. In such cases, you can enter the amounts directly in the corresponding general accounts.
A user with advanced accounting skills can enter accounting entries directly into the bank journal from Accounting > Journal Entries > Journal Items. The result is the same, but the operation is more complex because you must know the accounts to use and must have mastered the ideas of credit and debit.
Cash Management
To manage cash, you can use the menu Accounting > Bank and Cash > Cash Registers. At the start of the day you set the opening amount of cash in the entry (Opening Balance). Then click on button Open CashBox, after you can start making entries from the Cash Transactions tab.
You have to go menu Accounting > Configuration > Journals > Journals and open the cash journal , then go to the Cash Register tab of form and select option Opening With Last Losing Balance and Cash Control.
Because if you do not select that options , than you will find Opening Cash Control field 0.00 of Cash Register form. So first you have to configure Journal.
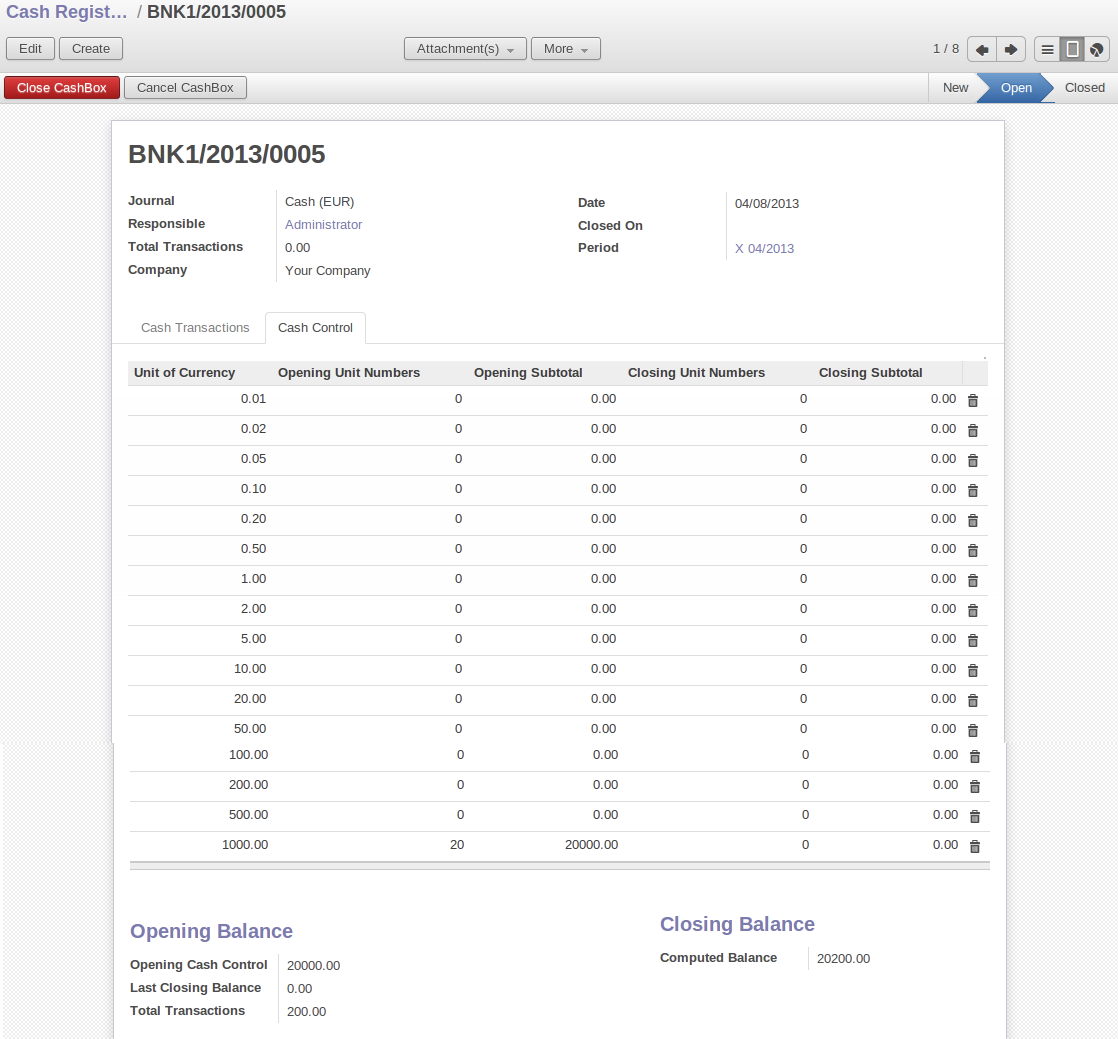
Defining the Cash Register
All the transactions throughout the day are then entered in this statement. When you close the cashbox, generally at the end of the day, enter the amounts on the Cash Control tab, in the Closing Balance section. Then confirm the statement to close the day's cash statement and automatically generate the corresponding accounting entries. Note that the Calculated Balance and the CashBox Balance need to be equal before you can close the cashbox.
Accounting entries are only generated when the cash statement is confirmed. So if the total statement has not been approved (that is to say during the day, in the case of petty cash), partner payments will not have been deducted from their corresponding account.
Manual Entry in a Journal
Invoices and statements produce accounting entries in different journals. But you could also create entries directly in a journal (line by line) without using the dedicated journal views. This functionality is often used for miscellaneous entries.
To make manual entries, go to the following menu Accounting > Journal Entries > Journal Items. In the Journal field from the filter, select the journal in which you want to post. When you select a journal in this filter, you do not have to fill in the journal when posting new entries.
Let us give the example of a purchase invoice. Note, however, that these entries are usually generated automatically by Odoo ERPOnline.
Click the Create button. Fill these fields manually in the following order:
Reference: reference from the invoice or entry.Effective date: effective date of the entry, will be preset with today's date.Period: financial period, will be preset with the current period.Partner: partner concerned.Account: general account (e.g. purchase account Products Purchase).Name: description of the invoice line (e.g. PC2).Debit: here you type the debit amount.Journal: here you select the journal in which you want to post.Credit: here you type the credit amount, e.g. 1196.
Press the Enter key on your keyboard to validate the first line. The next draft move number is assigned to your accounting entry. Your line is then colored red and takes the Unbalanced state. When a line is in the draft state, it is not yet reflected in the accounts. Odoo ERPOnline will not validate that line until the balancing entry is made (so the credit amounts must balance the debit amounts for that set of entries).
Odoo ERPOnline now proposes the balancing accounting line to be filled in. If the account used (in this case account 600000) includes taxes by default Odoo ERPOnline automatically proposes taxes associated with the amount entered. At this stage you can modify and validate this second line of the account, or replace it with other information such as a second purchase line.
When you have entered all of the data from your lines, Odoo ERPOnline automatically proposes counterpart entries to you, based on the credit entries.
When an accounting entry is matched, Odoo ERPOnline moves it to the Valid state automatically and prepares to enter the next data. Do not forget to definitely post the valid entries by clicking the Action button and selecting Post Journal Entries.
If you want to add some other balancing lines you can enter the number of the entry on the new line that you are entering. In such a case the whole line stays Draft until the whole set balances to zero.
Reconciliation Process
The reconciliation operation consists of matching entries in different accounts to indicate that they are related. Generally reconciliation is used for:
- Matching invoice entries to payments, so that invoices are marked as paid and customers do not get payment reminder letters for those entries (reconciliation in a customer account).
- Matching deposits and cheque withdrawals with their respective payments.
- Matching invoices and credit notes to cancel them out.
A reconciliation must be carried out on a list of accounting entries by an accountant, so that the sum of credits equals the sum of the debits for the matched entries.
Reconciliation in Odoo ERPOnline can only be carried out in accounts that have been configured as reconcilable (the Reconcile field).
Do not confuse account reconciliation and bank statement reconciliation
It is important not to confuse the reconciliation of accounting entries with bank statement reconciliation. Account reconciliation consists of linking account entries with each other, while statement reconciliation consists of verifying that your bank statement corresponds to the entries of that account in your accounting system.
There are different methods of reconciling entries. You have already seen the reconciliation of entries while doing data entry in an account. Automatic and manual reconciliations are described here.
Automatic Reconciliation
For automatic reconciliation, you will be asking Odoo ERPOnline to search for entries to reconcile in a series of accounts. Odoo ERPOnline tries to find entries for each partner where the amounts correspond.
Depending on the level of complexity that you choose (= power) when you start running the tool, the software could reconcile from two to nine entries at the same time. For example, if you select level 5, Odoo ERPOnline will reconcile, for instance, three invoices and two payments if the total amounts correspond. Note that you can also choose a maximum write-off amount, if you allow payment differences to be posted.
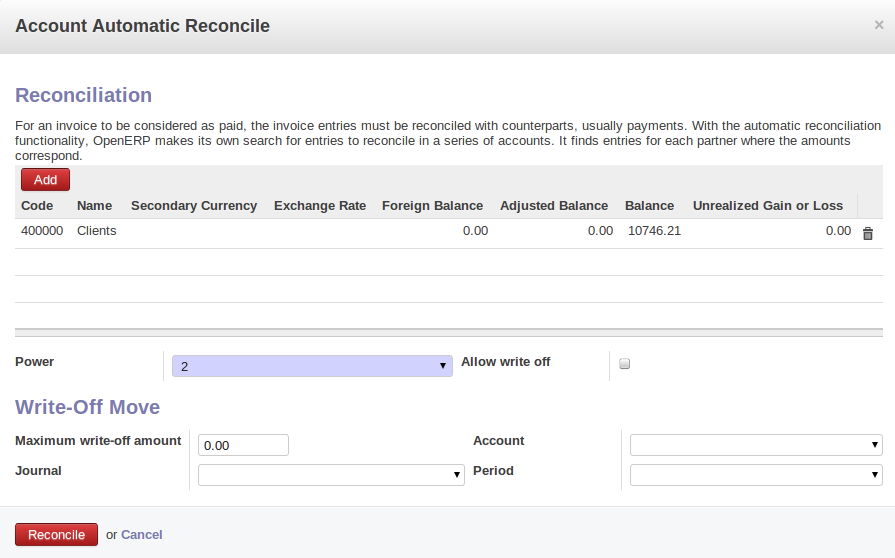
Form for Automatic Reconciliation
To start the reconciliation tool, click Accounting > Periodical Processing > Reconciliation > Automatic Reconciliation. A form opens, asking you for the following information:
Add Accounts to Reconcile: you can select one, several or all reconcilable accounts.- The Reconciliation
Power(from 2 to 4). - Checkbox
Allow write offto determine whether you will allow for payment differences. - Information needed for the adjustment (details for the
Write-Off Move).
You can reconcile any account, but the most common accounts are:
- All the Accounts Receivable – your customer accounts of type Debtor.
- All the Accounts Payable – your supplier accounts of type Creditor.
The write-off option enables you to reconcile entries even if their amounts are not exactly equivalent. For example, Odoo ERPOnline permits foreign customers whose accounts are in different currencies to have a difference of up to, say, 0.50 units of currency and put the difference in a write- off account.
You should not make the adjustment limits too large. Companies that introduced substantial automatic write-off adjustments have found that all employee expense reimbursements below the limit were written off automatically!
Manual Reconciliation
For manual reconciliation, open the entries for reconciling an account through the menu Accounting > Periodical Processing > Reconciliation > Manual Reconciliation.
You can also call up manual reconciliation from any screen that shows accounting entries. Select entries that you want to reconcile. Odoo ERPOnline indicates the sum of debits and credits for the selected entries. When these are equal you can click the Reconcile Entries button to reconcile the entries.
Suppose that you are entering customer order details. You wonder what is outstanding on the customer account (that is the list of unpaid invoices and unreconciled payments). To review it from the order form, navigate to the Partner record and select the view Receivables and Payables. Odoo ERPOnline opens a history of unreconciled accounting entries on screen.
After running the Reconcile Entries wizard, these lines can no longer be selected and will not appear when the entries are listed again. If there is a difference between the two entries, Odoo ERPOnline suggests you to make an adjustment. This write-off is a compensating entry that enables a complete reconciliation. You must therefore specify the journal and the account to be used for the write-off.
For example, if you want to reconcile the following entries:
| Date | Ref. | Description | Account | Debit | Credit |
|---|---|---|---|---|---|
| 12 May 11 | INV23 | Car hire | 4010 | 544.50 | |
| 25 May 11 | INV44 | Car insurance | 4010 | 100.00 | |
| 31 May 11 | PAY01 | Invoices n° 23, 44 | 4010 | 644.00 |
On reconciliation, Odoo ERPOnline shows a difference of 0.50. At this stage you have two possibilities:
- Do not reconcile, and the customer receives a request for 0.50.
- Reconcile and accept an adjustment of 0.50 that you will take from the P&L account.
Odoo ERPOnline generates the following entry automatically:
| Date | Ref. | Description | Account | Debit | Credit |
|---|---|---|---|---|---|
| 03 Jun 11 | AJ001 | Adjustment: profits and losses | 4010 | 0.50 | |
| 03 Jun 11 | AJ001 | Adjustment: profits and losses | XXXX | 0.50 |
The two invoices and the payment will be reconciled in the first adjustment line. The two invoices will then be automatically marked as paid.
Payment Management
Odoo ERPOnline gives you forms to prepare, validate and execute payment orders. This enables you to manage issues such as:
- Payment provided on several due dates.
- Automatic payment dates.
- Separating payment preparation and payment approval in your company.
- Preparing an order during the week containing several payments, then creating a payment file at the end of the week.
- Creating a file for electronic payment which can be sent to a bank for execution.
- Splitting payments depending on the balances available in your various bank accounts.
How to Manage your Payment Orders?
To use the tool for managing payments you must first install the module account_payment, or Go to menu Settings > Configuration > Accounting in eInvoicing & Payments section tick Manage payment orders. Supplier Payments are part of the core Odoo ERPOnline system.
The system lets you enter a series of payments to be carried out from your various bank accounts. Once the different payments have been registered, you can validate the payment orders. During validation you can modify and approve the payment orders, sending the order to the bank for electronic funds transfer.
For example, if you have to pay a supplier's invoice for a large amount you can split the payments amongst several bank accounts according to their available balance. To do this, you can prepare several draft orders and validate them once you are satisfied that the split is correct.
This process can also be regularly scheduled. In some companies, a payment order is kept in Draft state and payments are added to the draft list each day. At the end of the week, the accountant reviews and confirms all the waiting payment orders.
Once the payment order is confirmed, there is still a validation step for an accountant to carry out. You could imagine that these orders would be prepared by an accounts clerk, and then approved by a manager to go ahead with payment.
An Odoo ERPOnline workflow is associated with each payment order. Select a payment order, and if you are in the developer mode Click on Debug View# and then select print workflow to print the payment order workflow.
You can integrate more complex workflow rules to manage payment orders by adapting the workflow. For example, in some companies payments must be approved by a manager under certain cash flow or value limit conditions
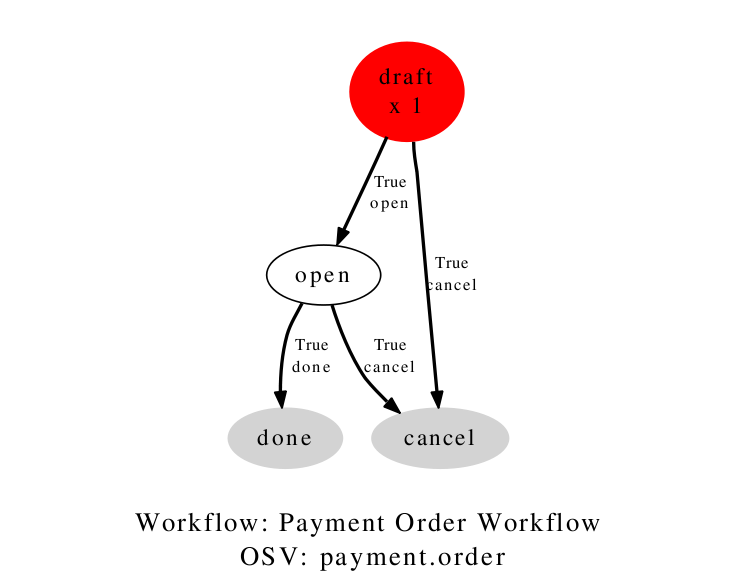
Payments Workflow
In small businesses it is usually the same person who enters the payment orders and who validates them. In this case you should just click the two buttons, one after the other, to confirm the payment.
Prepare and Transfer Orders
To enter a payment order, use the menu Accounting > Payment > Payment Orders.
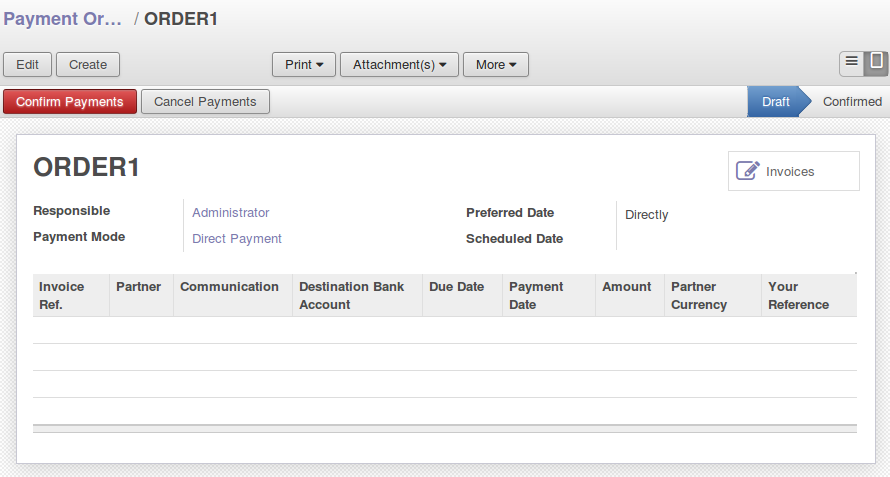
Entering a Payment Order
Odoo ERPOnline then proposes a reference number for your payment order.
You then have to choose a payment mode from the various methods available to your company. These have to be configured when you set up the accounting system using the menu Accounting > Configuration > Miscellaneous > Payment Mode. Some examples are:
- Cheques.
- Bank transfer.
- Visa card on a bank account.
- Petty cash.
Then, you set the Preferred date for payment:
Due date: each operation will be effected at the invoice deadline date.Directly: the operations will be effected when the orders are validated.Fixed date: you must specify an effective payment date in the Scheduled date if fixed field that follows.
The date is particularly important for the preparation of electronic transfers, because banking interfaces enable you to select a future execution date for each operation. So to configure your Odoo ERPOnline, most simply you can choose to pay all invoices automatically by their deadline.
You must then select the invoices to pay. They can be entered manually in the field Payment Line, but it is easier to add them automatically. For that, click Select Invoices to Pay and Odoo ERPOnline will then propose lines with payment deadlines. For each deadline you can see:
- The invoice
Payment Date. - The reference
Invoice Ref. - The deadline for the invoice.
- The amount to be paid in the partner's default currency.
You can then accept the payment proposed by Odoo ERPOnline, or select the entries that you will pay or not pay on that order. Odoo ERPOnline gives you all the necessary information to make a payment decision for each line item:
- Account.
- Supplier's bank account.
- Amount that will be paid.
- Amount to pay.
- The supplier.
- Total amount owed to the supplier.
- Due date.
- Date of creation.
You can modify the first three fields on each line: the account, the supplier's bank account and the amount that will be paid. This arrangement is very practical because it gives you complete visibility of all the company's trade payables. You can pay only a part of an invoice, for example, and in preparing your next payment order Odoo ERPOnline automatically suggests payment of the remainder owed.
When the payment has been prepared correctly, click Confirm Payments. The payment then changes to the Confirmed state and a new button appears that can be used to start the payment process.
You can print the payment order to send it to the bank by clicking the Print > Payment Order at the top of the screen.