
Financial Analysis
Whether you want to analyze the general health of your company or review the status of an Account Receivable in detail, your company's accounts are the place to define your various business indicators.
To show you the most accurate picture of your business, Odoo ERPOnline's accounting reports are flexible, and the results are calculated in real time. This enables you to automate recurring actions and to change your operations quickly when a company-wide problem (such as cash reserves dropping too low or receivables climbing too high) or a local problem (a customer that has not paid, or a project budget overspend) occurs.
This chapter describes the various reports and financial statements supplied by Odoo ERPOnline's accounting modules. It also describes how Odoo ERPOnline handles purchase and sales taxation, and the related tax reporting.
General Ledger and Trial Balance
A general ledger includes accounts with their debits and credits, and shows all transactions in an account, for one period, for several periods or for a financial year.
To print the General Ledger, you can use the menu Accounting > Reporting > Legal Reports > Accounting Reports > General Ledger. You will find the following wizard which is used to filter the resulting report.
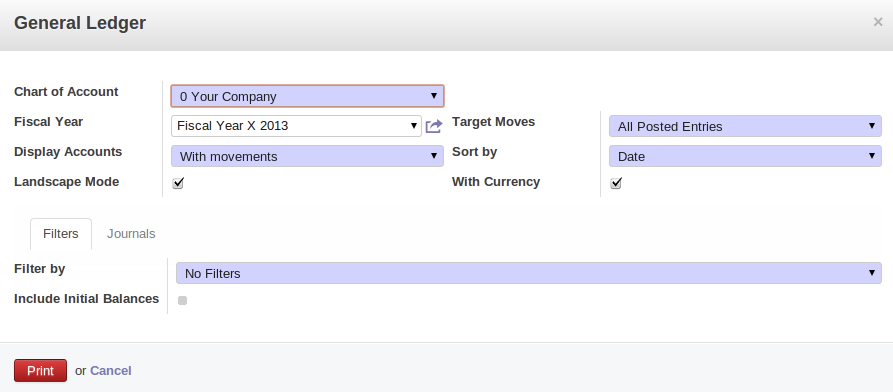
Preparing a General Ledger
Select the proper options and journal(s) from the above wizard to print the General Ledger. The report can also be filtered by date or by period. When you choose to print the general ledger from one date to another, or for one or more periods, you can also have the initial balances printed for the periods preceding the periods you selected. You can sort the report by date or by journal / partner.
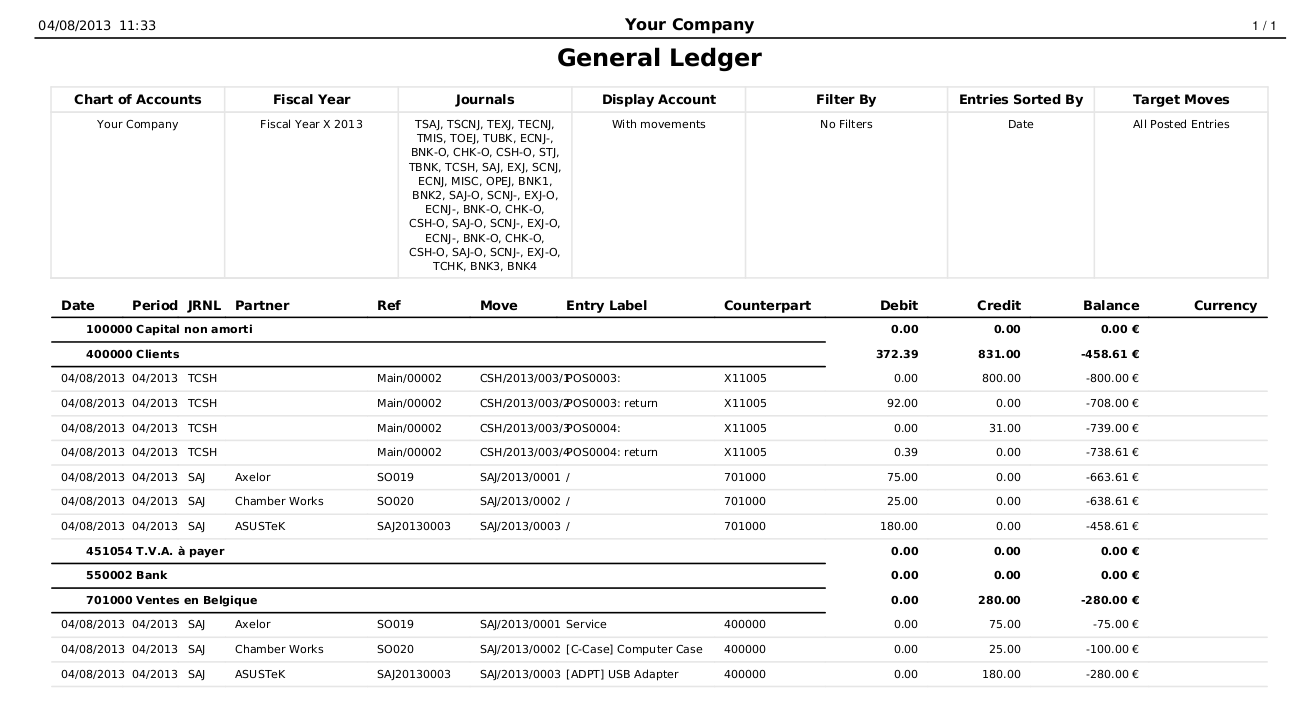
General Ledger
When you want to print the general ledger for one or more accounts, go to the menu Accounting > Configuration > Accounts > Accounts. Select the account(s) for which you want to print the general ledger and click the Print > General Ledger report at the top of the screen.
While the general ledger displays transactions for an account, a trial balance will show one amount (either debit or credit) for each account. The aim of the trial balance is to prove that the total of all debit balances is equal to the total of all credit balances.
To print the Trial Balance, go to the menu Accounting > Reporting > Legal Reports > Accounting Reports > Trial Balance. This report allows you to print or generate a PDF of your trial balance, allowing you to quickly check the balance of each of your accounts in a single report. A trial balance may include all accounts (even the ones without balance), only accounts with transactions or accounts of which the balance is not equal to zero. You can print a trial balance for all posted entries (meaning entries with a Valid state) or all entries, in which case the report will also print entries in a draft state. This option is useful, for instance, when your new financial year has just been opened, and you are preparing miscellaneous entries in the previous financial year.
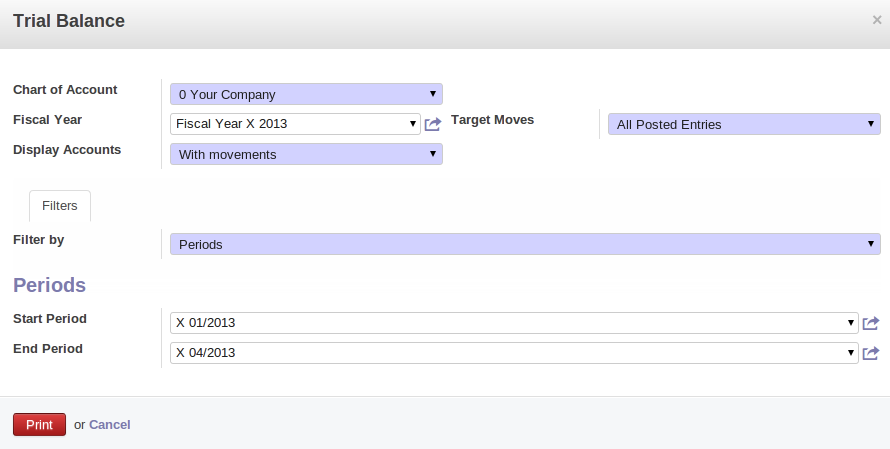
Trial Balance
Balance Sheet and Profit & Loss Report
Odoo ERPOnline also offers a Balance Sheet and a Profit & Loss Report.
A Balance Sheet is a financial statement that summarises the assets, liabilities and shareholders' equity of a company at a specific point in time. These three balance sheet segments give investors an idea as to what the company owns and owes, as well as the amount invested by the shareholders.
The balance sheet complies with the formula below:
Assets = Liabilities + Shareholders' Equity.
A balance sheet is often described as a snapshot of a company's financial condition.
The accounts displayed in the Balance Sheet are linked to an account type for which the P&L / Balance Sheet parameter is set to Balance Sheet (either Assets or Liabilities account). To configure Account Types, go to Accounting > Configuration > Accounts > Account Types.
The Balance Sheet can be printed from the menu Accounting > Reporting > Legal Reports > Accounting Reports > Balance Sheet. You can print this report in Landscape mode too.
A Balance Sheet needs a reserve & profit and loss account, but instead of entering it each time you start the report, you can add a default Reserve & Profit and Loss account through the menu Settings > Companies > Companies on the Configuration tab. This account will be used as a counterpart to balance your accounts.
The Profit & Loss Report is a financial statement which gives a summary of the revenues, costs and expenses during a specific period of time. Such a report provides information that shows the ability of a company to generate profit by increasing revenue and reducing costs. The P&L statement is also known as an "Income Statement".
The purpose of the Profit & Loss Report is to show managers and accountants whether the company earned or lost money during the report period.
In general, the Profit and Loss report will be used to determine profit ratios, to examine sales prices and costs, and to set marketing budgets, for instance.
The accounts displayed in the Profit and Loss Report are linked to an account type for which the "P&L / Balance Sheet parameter is set to Profit & Loss (either Expense or Income account). To configure Account types, go to Accounting > Configuration > Accounts > Account Types.
The Profit and Loss report can be printed from the menu Accounting > Reporting > Legal Reports > Accounting Reports > Profit And Loss.
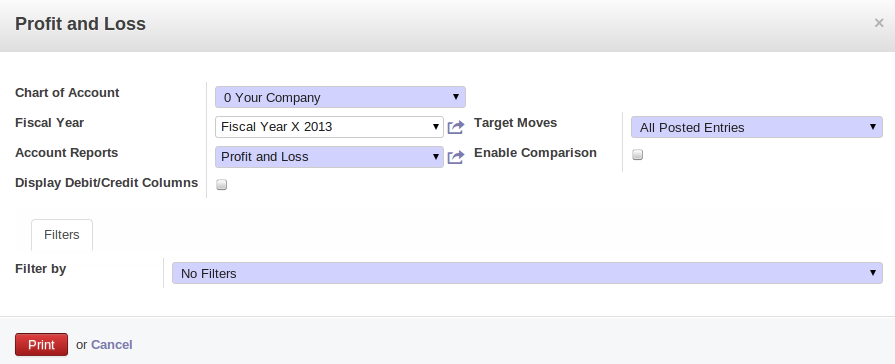
Profit and Loss Wizard
For printing report , you can click on Print button.
The Accounting Journals
A journal allows you to list entries in chronological order (by default according to date). Each entry posted in Odoo ERPOnline is recorded in such a journal. To configure the different accounting journals, go to the menu Accounting > Configuration > Journals > Journals.
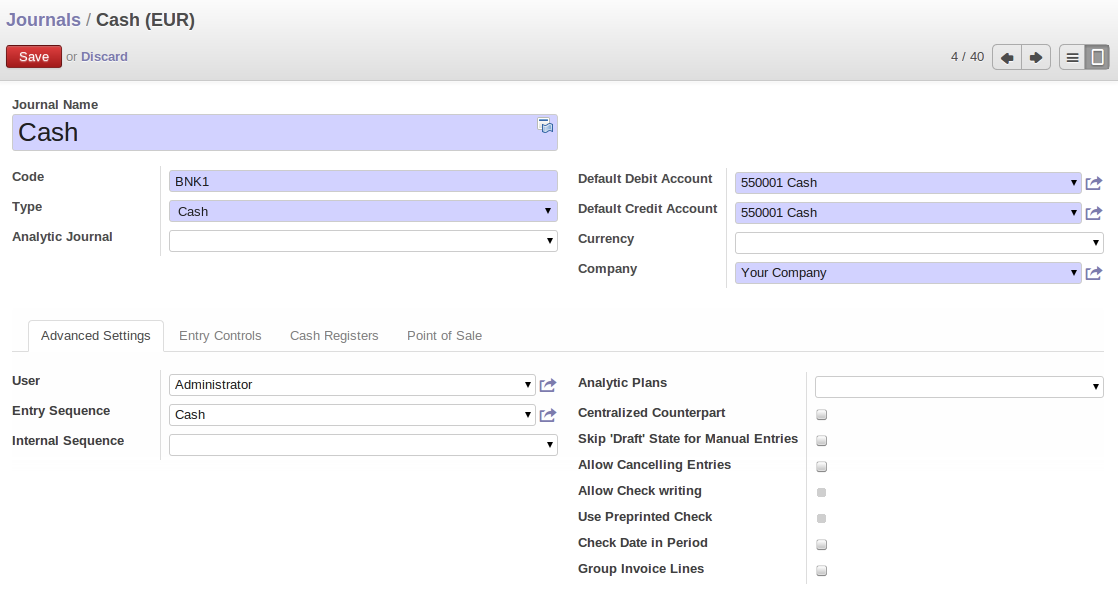
Defining a Journal
Odoo ERPOnline provides three main reports regarding the journals:
- To print a Journal, use the menu
Accounting > Reporting > Legal Reports > Journals > Journals. This report will show all entries per journal, e.g. sales entries, purchase entries, etc. Each transaction is mentioned, with date, reference, document number, account, partner, description and debit and credit amount. The Journal report can be printed per period and per journal.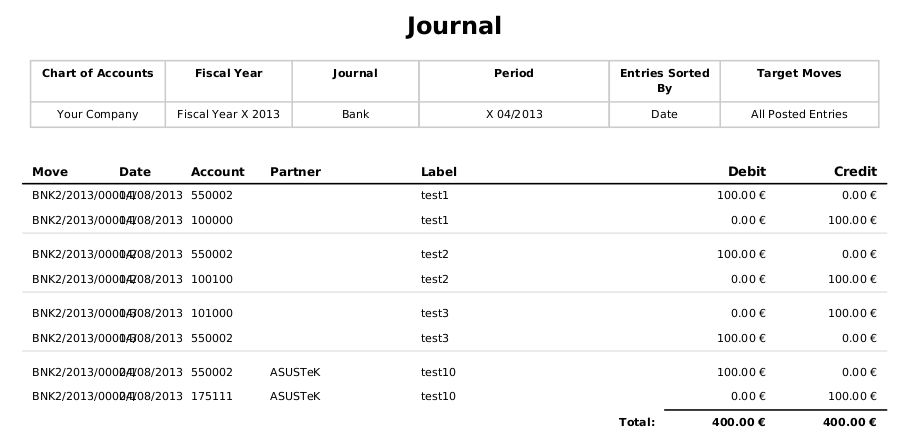
Printing a Journal
- To print a General Journal, use the menu
Accounting > Reporting > Legal Reports > Journals > General Journals. A General Journal will print a page per period for any journal entries posted in that period, and totalised per journal. The report will show the period, the journal, debit, credit and balance, but no details of the related entries.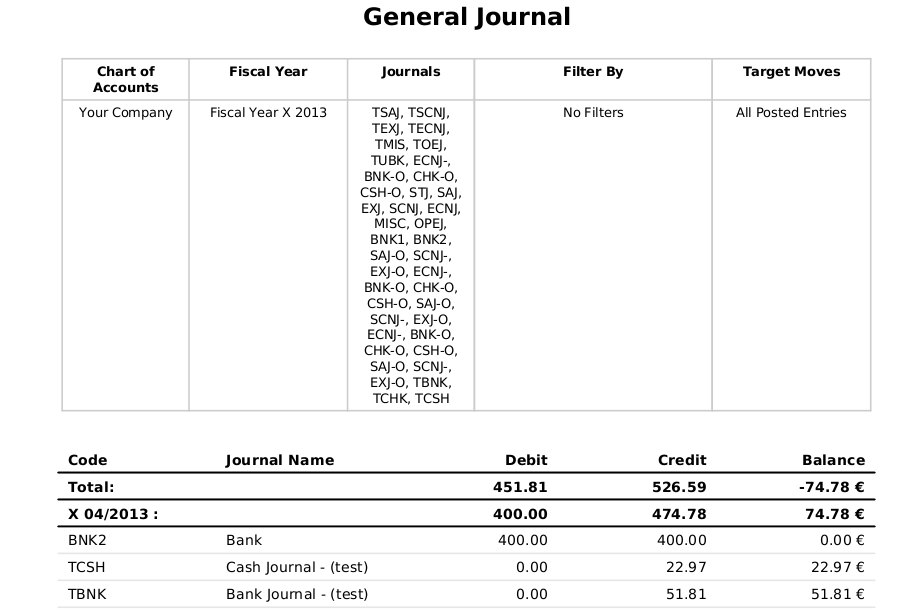
Printing a General Journal
- To print a Centralizing Journal, use the menu
Accounting > Reporting > Legal Reports > Journals > Centralizing Journal. A centralizing journal gives a summary per account for each journal and period of debit, credit and balance.
Printing a Centralizing Journal
Tax Declaration
Information required for a tax declaration is automatically generated by Odoo ERPOnline from invoices. In the section on invoicing, you will have seen that you can get details of tax information from the area at the bottom left of an invoice.
You can also get the tax information when you open a journal entry by looking at the columns to the right of each line. In the following figure , you can see the example of Journal Entry with VAT, from menu Accounting > Journal Entries > Journal Entries
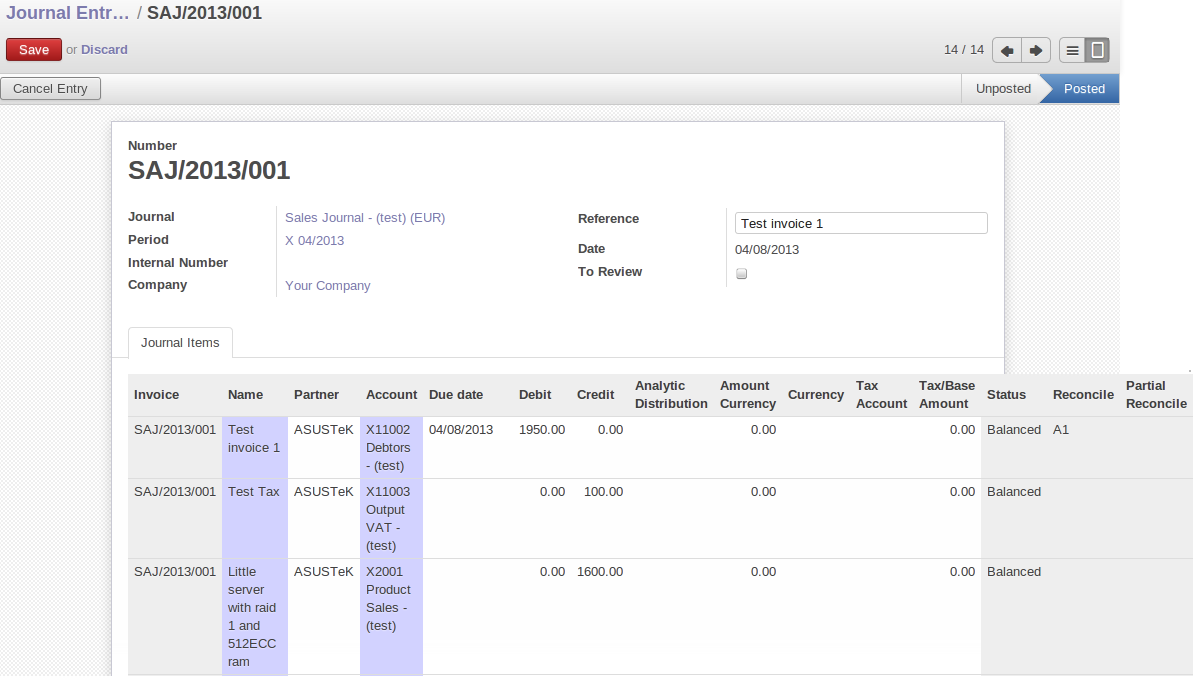
Journal Entry with VAT Information
Odoo ERPOnline keeps a tax chart that you can reach from the menu Accounting > Charts > Chart of Taxes. The wizard will propose to display entries for the current period only, but you can also leave the period empty to see a complete financial year. The structure of the chart is for calculating the VAT declaration, but all the other taxes can be calculated as well (such as the French DEEE).
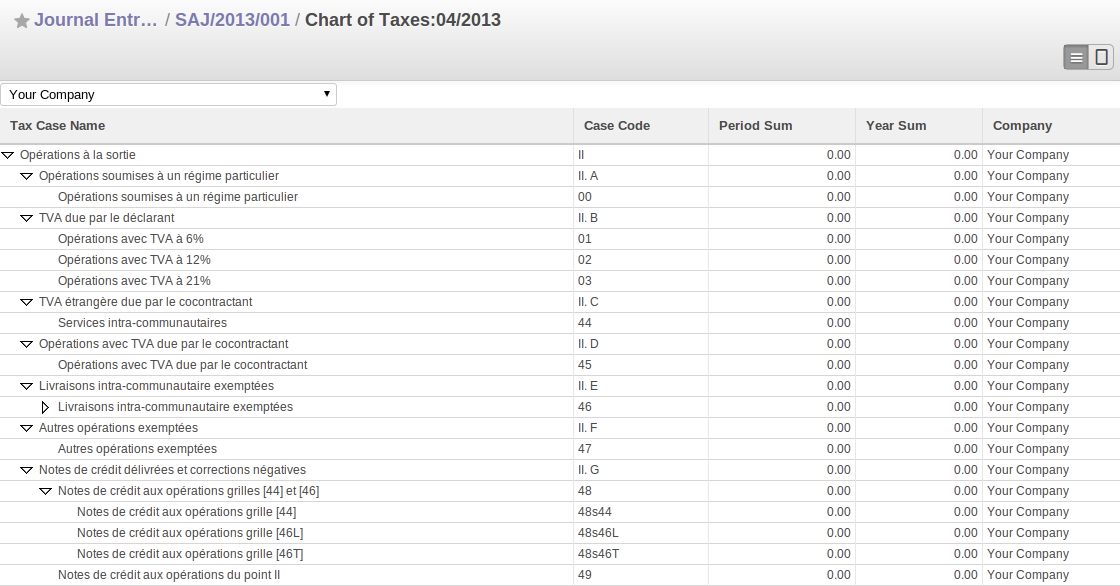
Example of a Belgian VAT Structure
The tax chart represents the amount of each area of the VAT declaration for your country. It is presented in a hierarchical structure which lets you see the detail only of what interests you and hides the less interesting subtotals. This structure can be altered as you wish to fit your needs.
You can create several tax charts if your company is subject to different types of tax or tax-like accounts, such as:
- Authors' rights.
- Ecotaxes, such as the French DEEE for recycling electrical equipment.
By creating several charts of taxes, you can print different declarations from the menu Accounting > Reporting > Generic Reporting > Taxes > Taxes Report. Simply select the chart of taxes you want to print in the wizard.
Each accounting entry can then be linked to one of the tax accounts. This association is done automatically from the taxes which had previously been configured in the invoice lines.
Some accounting software manages the tax declaration in a dedicated general account. The declaration is then limited to the balance in the specified period. In Odoo ERPOnline, you can create an independent chart of taxes, which has several advantages:
- It is possible to allocate only a part of the tax transaction.
- It is not necessary to manage several general accounts depending on the type of sales and the type of tax.
- You can restructure your chart of taxes as required.
At any time, you can check your chart of taxes for a given period using the report.
Data is updated in real time. This is very useful because it enables you to preview at any time the tax that you owe at the start and end of the month or quarter.
Furthermore, for your tax declaration, you can click one of the tax accounts to investigate the detailed entries that make up the full amount. This helps you search for errors, such as when you have entered an invoice at full tax rate when it should have been zero-rated for an intracommunity trade or for charity.
Management Indicators
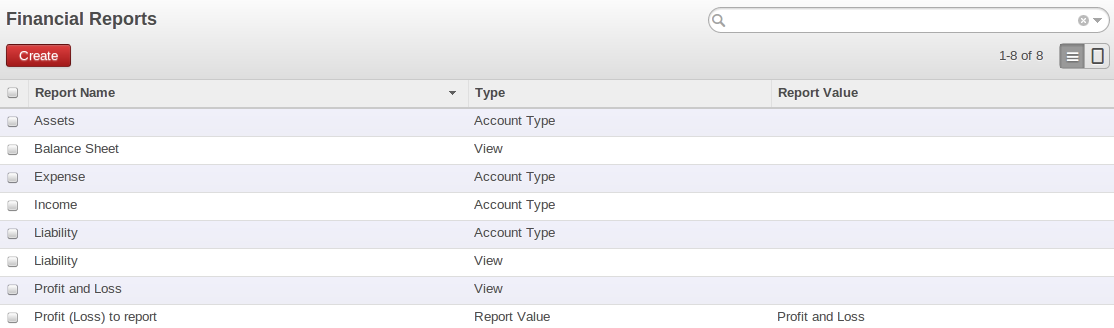
With OpenERP you can also create your own financial reports. This feature is now included in standard Odoo ERPOnline. Go to Accounting > Configuration > Financial Reports > Account Reports and click Create.
Suppose we would like to create our company Balance Sheet. The first report to be created, should be a View report which will contain the final details. Keep the default Sequence 0.
Now create the Assets report, and set Balance Sheet as the parent for this report. Set the Sequence to 1.
Now create the Liabilities report, and set Balance Sheet as the parent for this report too. Set the Sequence to 2.
Both these reports are of the View type.
Apart from the View type, you can select three other types: Accounts, Account Type and Report Value.
Accounts: here you can select view accounts or individual accounts that should be included in the report. View accounts offer the advantage that when new accounts are added as a child of such view account, they will automatically be printed on the report. When selecting individual accounts, you need to specifically add each newly created account to get the correct report.Account Type: selecting an account type means that all accounts related to the selected account type(s) will be printed on the report.Report Value: thanks to this value you can include the balance of existing reports in another report. Example: create a profit & loss report (view) including costs (account class 6) and income (account class 7). In the Balance Sheet, define a report Profit&Loss Balance, with Balance Sheet as the Parent. Set the type to Report Value and link it to the P&L view report you defined. This way, the balance sheet will print the Profit&Loss result.
Financial Reports
Create a report to print the Asset accounts (class 2 from the Belgian ledger) on the Assets side of the report. As a Parent, define the Assets report; sequence 3, type Accounts. If you want to use all accounts of class 2, just select the class (view account). You can also select various asset accounts. You could also have set this report to Account Type, with type Immo.
If you just want the sum of the selected accounts to appear, you leave the settings as they are. Should you wish to print the account details as well, you can select the Display details checkbox. The report will then also print the selected account numbers.
To print the results, go to ccounting > Reporting > Legal Reports > Accounting Reports > Financial Report. Select the report you want to print (only reports of the View type will be displayed in the list). You can also print a report for specific periods or dates. If you select the Enable Comparison checkbox, an extra Comparison tab will appear in which you can, for instance, select periods from a previous financial year. You have to give the comparison column a name through the Column Label field.
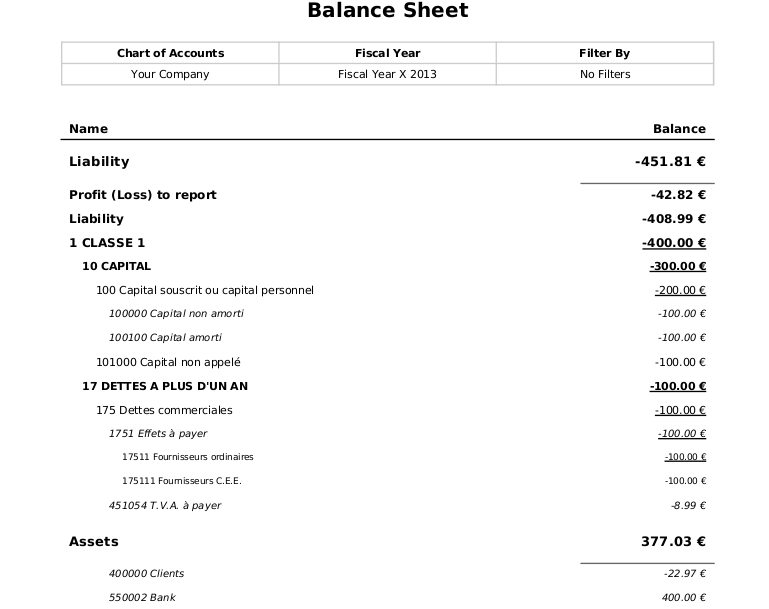
Example of a Financial Report
Good Management Budgeting
Budgets are important for a company to get a good grip on forecasted expenses and revenues. They allow you to measure your actual financial performance against the planned one.
Odoo ERPOnline manages its budgets using both General and Analytic Accounts. Go to Settings > Modules > Modules and install account_budget to be able to do this, or you can go to Settings > Configuration > Accounting and select option Budget management and click on Apply button , it will install this module.
The first step in defining budgets is to determine the general accounts for which you want to keep budgets (typically expense or income accounts). That is what you will use Budgetary Positions for, from the menu Accounting > Configuration > Budgets > Budgetary Positions. Here you can select the general accounts for which you want to keep budgets. The aim is to group general accounts logically, according to sales or purchases, for instance. Odoo ERPOnline has no limitations as to the account types that can be used for budgeting.
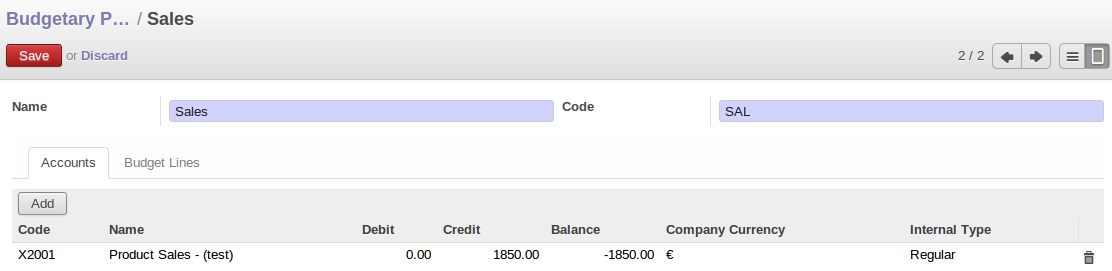
Budgetary Position for Sales
To define your budgets, go to the menu Accounting > Budgets > Budgets. Define a new budget by clicking the Create button.

Optimistic Budget
Even though you can modify a budget at any time to make a revision, we recommend you to create a new budget, because otherwise you will have no history of changes.
Rather than edit an existing budget, make a new version so that you can keep your original estimates safe for comparison. This lets you analyse your changing perspectives of the company from revision to revision.
To define your budgets, start by entering a Name, a Code, a Duration for your new budget. Then you can define the budgeted amounts for each analytic account within a specified period, one by one (enter negative amounts for purchases, positive amounts for sales). For each, you define:
- An
Analytic Account. - A
Budgetary Position, for example Sales or Purchases. - A
Durationfor the budget. - A
Planned Amountin the default currency of the chart of accounts.
Once this information is completed, save your budget.
A budget has various stages:
Confirmed: the budget is to be reviewed, but it can still be changed before actual approval.Approved: the budget is approved by the budget holder; the name of the user approving the budget will be displayed in the Validate User field.
You can cancel a budget and reset it to draft for the two preceding steps.
Done: the budget is fully approved and no changes will be allowed. You can no longer cancel the budget and reset it to draft.
The Theoretical Amount indicates the actual amount that might have been realised for the budget concerned according to the current date. When your budget is 1200 for 12 months, and today is the 30 October, the theoretical amount will be 1000, since this is the actual amount that could have been realised to date.
To print a budget and make calculations of expenditure through budget, use the menu Accounting > Budgets > Budgets. Odoo ERPOnline then gives you a list of available budgets. Select one or more budgets and then click Print Budgets to create the report for each, in a date range of your choice.
The Print Budget report gives an overview of each analytic account included in your budget, according to the individual budgetary positions for that account. From the percentage and the comparison of planned (budgeted) and practical (actual) amounts, you have a good view on your situation.
From the same list of actions, you can also print the Print Summary report, which will give you a total per analytic account (without splitting by budgetary position).
Each of these reports can be printed from a specific date to a specific date. The End Date selected in the wizard determines how the theoretical amount will be calculated; if you select the last day of your financial year, the theoretical amount will be calculated as a function of that date (thus considering a complete financial year). Note that the theoretical amount will be zero when the Paid Date entered is equal to or greater than the End Date for the budget.
The percentage for a budget is calculated as follows: (practical amount / theoretical amount) x 100. This way you get a view on how much of the forecasted amount has been actually realised in your accounting.
The figure Printing a Budget gives an example of a budget produced by Odoo ERPOnline.
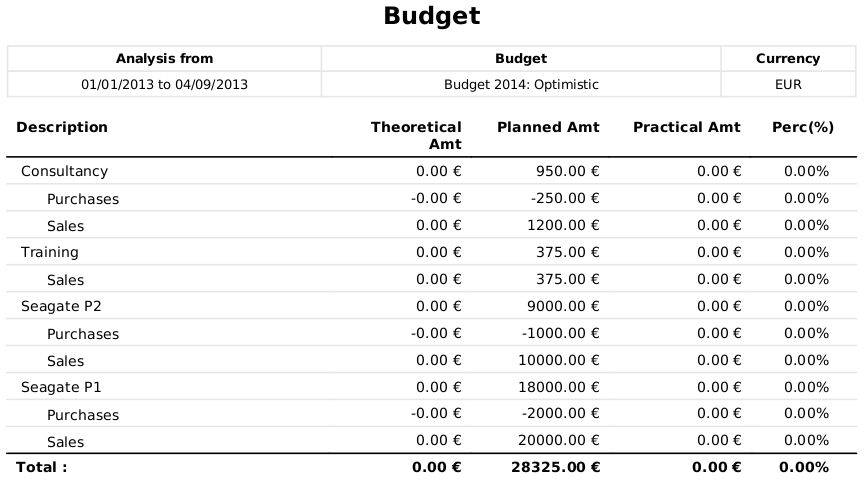
Printing a Budget
You can Print the Summarised Budget from selecting Print Summary option in Print button Option.
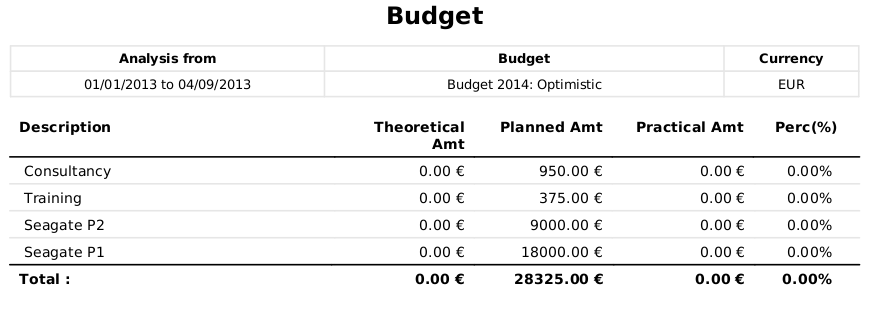
Summarised Budget
You could also use the menu Accounting > Reporting > Generic Reporting > Budgets > Budget Lines. This gives an analysis of each budget line.
You can also print budgets from the menu Accounting > Configuration > Analytic Accounting > Analytic Accounts.