Invoices
In Odoo ERPOnline, the concept of “invoice” includes the following documents:
- The Customer Invoice.
- The Supplier Invoice.
- A Customer Credit Note or Customer Refund.
- A Supplier Credit Note or Supplier Refund.
Only the invoice type and the representation mode differ for each of the four documents. But they are all stored in the same object type in the system. You get the correct form for each of the four types of invoice from the menu you use to open it. The name of the tab enables you to tell the invoice types apart when you are working on them.
There are many advantages in deriving the different types of invoice from the same object. Two of the most important are:
- In a multi-company environment with inter-company invoicing, a customer invoice in one company becomes a supplier invoice for the other.
- This enables you to work and search for all invoices from the same menu. If you are looking for an invoicing history, Odoo ERPOnline provides both supplier and customer invoices in the same list, as well as credit notes.
A credit note is a document that enables you to cancel an invoice or part of an invoice.
To access customer invoices in Odoo ERPOnline, use the menu Accounting > Customers > Customer Invoices, and for supplier invoices, use the menu Accounting > Suppliers > Supplier Invoices.
Most of the time, invoices are generated automatically by Odoo ERPOnline as they are generated from other processes in the system. So it is not usually necessary to create them manually, but simply approve or validate them. Odoo ERPOnline uses the following different ways of generating invoices:
- From Supplier or Customer Orders.
- From receipt or dispatch of goods.
- From work carried out (timesheets, see Key Features HR).
- From closed tasks (see Drive your Projects).
- From fee charges or other rechargeable expenses (see Deliver Quality Services).
The different processes generate Draft invoices. These must then be approved by a suitable system user and sent to the customer. The different invoicing methods are detailed in the following sections and chapters.
It is also possible to enter invoices manually. This is usually done for invoices that are not associated with an order (usually purchase orders) or Credit Notes. Also, if the system has not been configured correctly you might need to edit the invoice before sending it to the customer.
For example, if you have not realized that the customer is tax-exempt, the invoice you generate from an order will contain tax at the normal rates. It is then possible to edit this out of the invoice before validating it.
Entering a Customer Invoice
The principle of entering data for invoices in Odoo ERPOnline is very simple, as it enables non- accountant users to create their own invoices. This means that your accounting information can be kept up-to-date all the time as orders are placed and received, and their taxes are calculated.
At the same time, it allows people who have more accounting knowledge to keep full control over the accounting entries that are being generated. Each value proposed by Odoo ERPOnline can be modified later if needed.
Start by manually entering a customer invoice. Use Accounting > Customers > Customer Invoices and click on Create button for this.
A new invoice form opens for entering information.
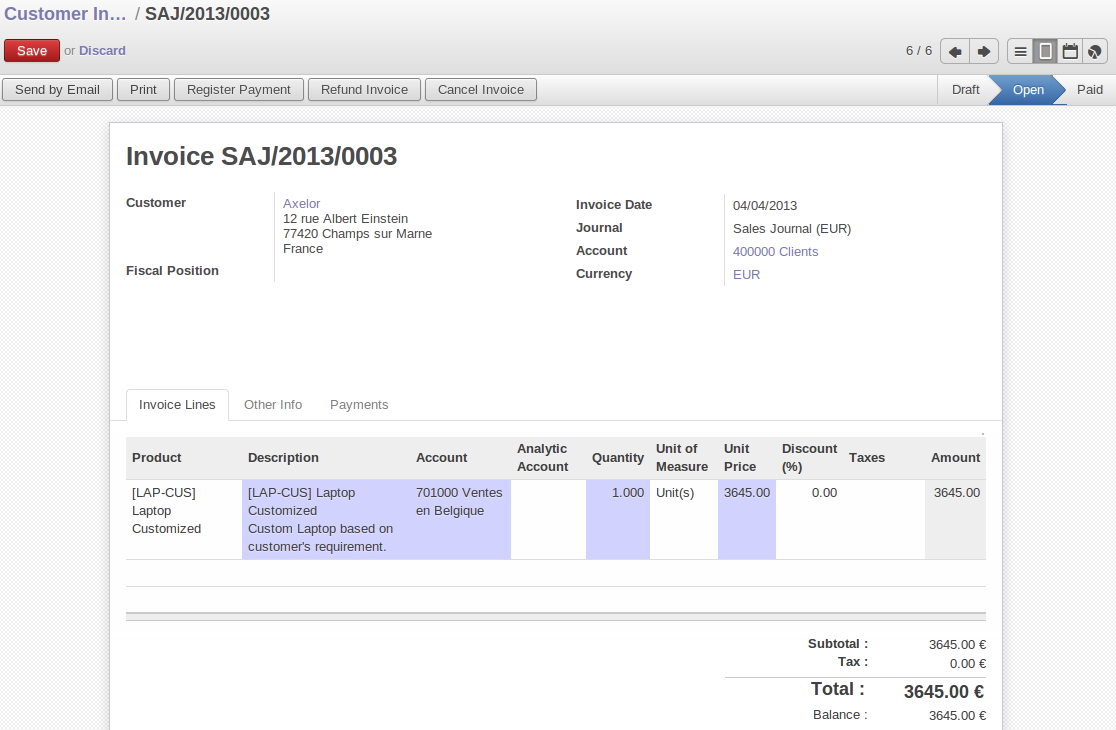
Entering a New Invoice
The document is composed of three parts:
- The top of the invoice, with customer information.
- The main body of the invoice, with detailed invoice lines.
- The bottom of the page, with some additional information, taxes, and the totals.
To enter a document in Odoo ERPOnline, you should always fill in fields in the order they appear on screen. Doing it this way means that some of the later fields are filled in automatically from the selections made in earlier fields. So select the Customer, and the following fields are completed automatically:
- The invoice address corresponds to the customer contact that was given the address type of Invoice in the customer form (or otherwise the address type of Default).
- The customer account corresponds to the account given in the
Accountingwhich is found in a tab of the customer form. - A specific or a default payment condition can be defined for this customer in the Accounting tab of the customer form. Payment conditions are generated by rules for the payment of the invoice. For example: 50% in 21 days and 50% in 60 days from the end of the month.
Properties Fields
The Properties fields on the Customer form or the Product form are multi-company fields. The value that the user sees in these fields depends on the company that the user works for.
If you work in a multi-company environment that is using one database, you have several charts of accounts. Asset and liability accounts for a customer depend on the company that the user works for.
You can reach more information from certain relation fields in Odoo ERPOnline.
- In Odoo ERPOnline, a relation is commonly a hyperlink - it takes you to the main form for that entity, with all of the actions and links.
So one way or another you can rapidly reach the customer's:
- Current sales and purchases.
- CRM requests.
- Open invoices.
- Accounts records.
- Payable and receivable accounts.
You can add more detailed additional information to the invoice and select the currency that you want to invoice in. Once the invoice heading is saved, you must enter the different invoice lines. You could use either of the two techniques:
- Enter the whole field manually.
- Use a product to complete the different fields automatically.
The invoice line description is more of a title than a comment. If you want to add more detailed comments you can use the field Additional Information.
So select the product Laptop Customized in the product field in an invoice line. The following fields are then completed automatically:
Description: this comes from the product, in the language of the partner.Account: determined by the purchase or sales account defined in the product properties. If no account is specified in the product form, OpenERP uses the properties of the category that the product is associated with.Unit of Measure: this is defined by default in the product form.Unit Price: this is given by the sales price in the product form.Taxes: provided by the product form and the partner form.
By default, Odoo ERPOnline invoices and processes the price without taxes – they are managed as a separate amount. Odoo ERPOnline can manage tax inclusive prices when you check the Tax Included in Price field true when configuring the tax.
You can enter several invoice lines and modify the values that are automatically completed by Odoo ERPOnline. Once the invoice lines have been entered, you can click (update) on the invoice to get the details of tax calculated such as:
- Untaxed Amount.
- Tax Amount.
- Total Amount.
In the Other Info tab at the bottom you will find the details of the total calculated for different tax rates used in the invoice. Before approving the invoice you can modify the date and the accounting period, which are entered by default as today's date. A click on PRO-FORMA moves from the Draft to Pro-forma state. And click Validate when you want to approve the invoice. It moves from the Draft state to the Open state.
In order to get the PRO-FORMA button on invoice, go to the menu Settings > Accounting, eInvoicing & Payments section and click the boolean field Allow pro-forma invoices.
When you have validated an invoice, Odoo ERPOnline gives it a unique number from a defined sequence. By default it takes the form Journal Code/Year/Sequence Number for example, SAJ/2010/005 . You cannot modify an invoice number, but instead, you should modify the sequence numbers through the menu Settings > Configuration > Accounting, eInvoicing & Payments section and provide Next Invoice number
Accounting entries corresponding to this invoice are automatically generated when you approve the invoice. You see the details by clicking the entry in the Journal Entry field and searching there for the account moves generated by that invoice number.
Furthermore, you can also Print or Email your Invoice.
Tax Management
Details on the product form determine the selection of applicable taxes for an invoice line. By default, Odoo ERPOnline takes account of all the taxes defined in the product form. Take the case of the following product:
- Applicable taxes:
- TVA: 19.6% type TVA.
- DEEE: 5.5, type DEEE.
The DEEE tax (disposal of electronic and electrical equipment) is an ecological tax that was imposed in France from 2009. It is applied to batteries to finance their recycling and is a fixed sum that is applied to the before-tax amount on the invoice.
If you trade with a company in your own country, and your country has a DEEE-type tax, the applicable taxes for this invoice could be:
- DEEE: 5.5.
- TVA: 19.6%.
If you sell to a customer in another company in the community (intracommunity), instead, then tax is not charged. In the partner form, in the tab Accounting, the field Fiscal Position maintains information whether the customer is within the region or not. When you create an invoice for this customer, Odoo ERPOnline will calculate the following taxes on the product:
- DEEE: 5.5.
- TVA intracommunity: 0%.
If you have not entered the parameters in the customer form correctly, Odoo ERPOnline will suggest incorrect taxes in the invoice. That is not a real issue, because you can always modify the information directly in the invoice before approving it.
When you create an invoice for a product that will only be bought or sold once, you do not have to encode a new product. Instead, you will have to provide quite a bit of information manually on the invoice line:
- Product Description.
- Account.
- Quantity.
- Unit Price
Cancelling an Invoice
By default, Odoo ERPOnline will not allow you to cancel an invoice once it has been approved. Since accounting entries have been created, you theoretically cannot go back and delete them. However, in some cases, it is more convenient to cancel an invoice when there is an error than to produce a credit note and reconcile the two entries. Your attitude to this will be influenced by current legislation in your accounting jurisdiction and your adherence to accounting purity.
Odoo ERPOnline accommodates either approach. Install the account_cancel module. Then allow cancelling an invoice by checking the box Allow Cancelling Entries in the Journal corresponding to this invoice. You will then be allowed to cancel the invoice if the following two conditions are met:
- The accounting entries have not been reconciled or paid: if they have, then you will have to cancel the reconciliation first.
- The accounting period or the fiscal year has not already been closed: if it is closed then no modification is possible.
Cancelling an invoice has the effect of automatically modifying the corresponding accounting entries.
To be able to cancel invoices, you should install the module account_cancel. You can cancel an invoice if the Allow Cancelling Entries function has been activated in the journal and the entries have not yet been reconciled. You could then move it from Cancelled to the Draft state to modify it and regenerate it.
Some countries require you to have contiguously numbered invoices (that is, with no break in the sequence). If, after cancelling an invoice that you are not regenerating, you find yourself with a break in the numbering you would have to go and modify the sequence, redo the invoice and replace the sequence number with its original value.
You can control the sequences using the menu Settings > Technical > Sequences & Identifiers > Sequences.
Cancelling an invoice will cause a break in the number sequence of your invoices. You are strongly advised to recreate this invoice and re-approve it to fill the hole in the numbering if you can.
The duplication function can be applied to all the system documents: you can duplicate anything – a product, an order, or a delivery.
Instead of entering a new invoice each time, you can base an invoice on a similar preceding one and duplicate it. To do this, first search for a suitable existing invoice. In the web client, show the invoice in read-only (non-editable) form view, then click on More and Duplicate.
The duplication creates a new invoice in the Draft state. That enables you to modify it before approving it. Duplicating documents in Odoo ERPOnline is an intelligent function, which enables the duplicated invoice to be given its own sequence number, today's date, and the draft state, even if the preceding invoice has been paid.
Creating a Supplier Invoice
The form that manages supplier invoices is very similar to the one for customer invoices. However, it has been adapted to simplify rapid data entry and monitoring of the amounts recorded.
Many companies do not enter data on supplier invoices, but simply enter accounting data corresponding to the purchase journal.
This particularly applies to users that have focused on the accounting system rather than all the capabilities provided by an ERP system. The two approaches reach the same accounting result: some prefer one and others prefer the other depending on their skills.
However, when you use the Purchase Management functions in Odoo ERPOnline you should work directly on invoices because they are provided from ,code>Purchase Orders or Goods Receipt documents.
To enter a new supplier invoice, use the menu Accounting > Suppliers > Supplier Invoices.
Everything is similar to the customer invoice, starting with the Journal unless the default is acceptable, and then the Supplier, which will automatically complete the following fields
- Partner Account.
Unlike the customer invoice, you do not have to enter payment conditions – simply a Due Date if you want one. If you do not give a due date, Odoo ERPOnline assumes that this invoice will be paid in cash. If you want to enter more complete payment conditions than just the due date, you can use the Payment Term field which you can find on the second tab Other Info.
Indicate the Currency if the invoice is not going to use the default currency, then you can enter the Invoice Lines.
Just like the customer invoice, you have the choice of entering all the information manually or use a product to complete many of the fields automatically. When you enter a product, all of the following values are completed automatically:
- The product
Accountis completed from the properties of the product form or the Category of the product if nothing is defined on the product itself. - The
Taxescome from the product form and/or the partner form, based on the same principles as the customer invoice. - The
Quantityis set at 1 by default but can be changed manually. Unit Price: this is given by the cost price in the product form.
You can click (update) on the invoice in the Edit mode to get the details of tax calculated. Odoo ERPOnline automatically completes the Invoice Date and the accounting period.
Accounting periods are treated as legal period declarations. For example, a tax declaration for an invoice depends on the accounting period and not on the date of invoicing.
Depending on whether your declarations are made monthly or quarterly, the fiscal year contains either twelve or four accounting periods.
The dates are shown in the document you created in the accounting system. They are used for calculating due dates.
The two pieces of information do not have to have the same date. If, for example, you receive an invoice dated 5th January which relates to goods or services supplied before 31st December, the invoice may be coded into the December accounting period and thus be recognized in that period for the tax declaration, while the invoice can remain 5th January which remains the basis of the due date for payment.
You can find that the amounts do not correspond with what your supplier has given you on paper for reasons that can include:
- The supplier made a calculation error.
- The amounts have been rounded differently.
Rounding Tax
It often happens that a supplier adds 1 to the total because the tax calculation has been rounded upwards. Some tax amounts are not valid because of this rounding.
For example, it is impossible to arrive at the amount of 145.50 if you are working to a precision of 2 decimal places and a rate of 19.6%:
- 121.65 x 1.196 = 145.49
- 121.66 x 1.196 = 145.51
In this case you can add a row in the Taxes so that you can adjust a total.
When the totals tally, you can validate the invoice. Odoo ERPOnline then generates the corresponding accounting entries. You can manage those entries using the Account fields on the invoice and on each of the invoice lines.
Credit Notes / Refunds
Entering a customer credit note is almost identical to entering a customer invoice. You just start from the menu Accounting > Customers > Customer Refunds.
Similarly, entering a supplier credit note is the same as that of the supplier invoice, and so you use the menu Accounting > Suppliers > Supplier Refunds.
It is easy to generate a credit note quickly from an existing invoice. To do this, select a customer or supplier invoice which is in Paid state and click the Refund button. Odoo ERPOnline opens a new payment invoice form for you in the Draft state so that you can modify it before approval.
Below you find the different options displayed when you click the Refund button on an invoice.
Create a Draft Refund: Creates a draft credit note of the complete invoice. You can change this credit note, i.e. to make a partial credit note.Modify: Creates a credit note for the existing invoice, validates the credit note and reconciles it with the invoice. The existing invoice is duplicated so that you can modify it.Cancel: Creates a credit note for the complete invoice, validates the credit note and reconciles it with the invoice concerned.
Payments
An invoice is automatically marked as Paid by Odoo ERPOnline once invoice entries have been reconciled with payment entries. You yourself do not have to mark the invoices as paid: Odoo ERPOnline manages that when you reconcile your payments.
Generally, you reconcile the invoice's accounting entries with their payment(s). But you can also reconcile an invoice with the entries from the corresponding credit note instead, to mutually cancel them.
You have seen the Register Payment button in the invoice form which is in Open state. This lets you enter payments and get entries reconciled very quickly.
You can also manage the payment of invoices when you are entering bank statements and cash transactions. These allow better control of financial transactions and permit greater flexibility in areas such as:
- Advance and partial payments of invoices.
- Payment of several invoices by several payments.
- Fine-grained management of different due dates on the same invoices.
- Management of adjustments if there are different amounts to those on the invoice.