Managing Human Resources
For Odoo ERPOnline, “employee” represents all of the physical people who have a work contract with the company. This includes all types of contracts: contracts with both fixed and indeterminate time periods, and also independent and freelance service contracts.
A “user” is a physical person who is given access to the company's systems. Most employees are users but some users are not employees: external partners can have access to parts of the system.
Here are some examples of functions which depend on the accuracy of the employee list:
- The cost of a service, which depends on the employee's working contract.
- Project planning, which depends on the work pattern of the project contributors.
- The client billing rate, which probably depends on the employee's job function.
- The chain of command, or responsibilities, which is related to the hierarchical structure of the company.
Link employees and Odoo ERPOnline users
To define a new employee in Odoo ERPOnline, use the menu Human Resources > Human Resources > Employees.

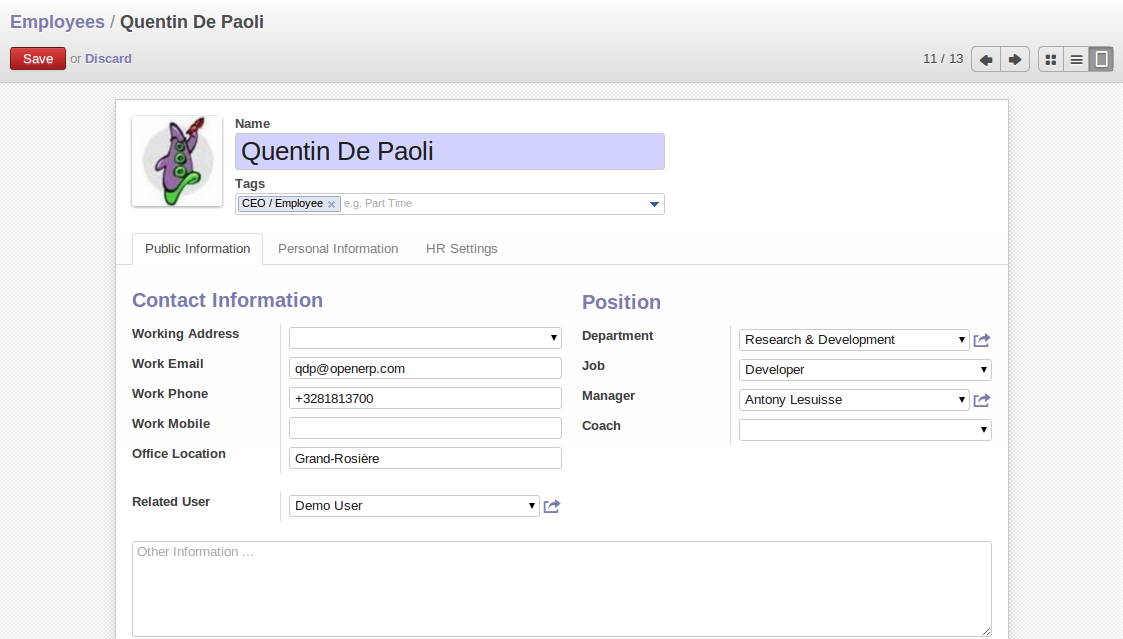
Form describing an employee
Start by entering the employee's name in Name and the employee category i.e. Tags. You can then create a new user of the Odoo ERPOnline system linked to this employee by filling in a new User form through the Related User field. And the company that this employee works for in Company.
Even if the employee is not a user, it is best if you create a system access for most of your staff just so that you can control their access rights from the outset (and you can do that through this field if you need to).
If the employee has a user account on the system, you always link his or her user account to the employee form.
Creating this link enables automatic completion to be done on the Employee field in the relevant forms, such as services and expense records.
Then enter the employee's address.
This appears in the partner contact form in Odoo ERPOnline. Since employees are people that have contracts with your company, it is logical that they have entries like any other partner in your database. So enter the name of the employee as a new partner Name and the address. Then all of the functions that apply to a partner can also be applied to an employee. This is particularly useful for tracking debits and credits in the accounts – so you can track salary payments, for example.
To help employees encode and validate timesheets and attendances, you can install hr_timesheet_sheet by going to the menu Settings > Modules > Local Modules. You can then set both an analytic journal and linked a product to an employee in the HR Settings tab of employee form. If you do it that way, then this information can be used to track services. For now, just complete the form with the following information:
Analytic Journal: usually a Timesheet Journal.Product: a service product that describes how this employee would be charged out, for example as Service on Timesheet.
At the top right of the form you can find button which will lead you to the Timesheets associated with that employee.
Define employees' billing prices and costs
To be able to use the timesheets at all, you must first define those employees who are system users. The employee definition forms contain the information necessary to use that sheet, such as the job title, and hourly costs.
Two fields will be of particular interest to you for managing timesheets: the Analytic Journal and the Product.
All the analytic entries about the costs of service times will be stored in the analytic journal. These enable you to isolate the cost of service from other company costs, such as the purchase of raw materials, expenses receipts and subcontracting. You can use different journals for each employee to separate costs by department or by function.
The employee is also associated with a product in your database in Odoo ERPOnline. An employee is linked with a product, so they can be 'bought' (subcontracting) or 'invoiced' (project management). You have to create a product for each job type in your company.
The following information is important in the product form:
Name: Secretary , Salesperson or Project Manager.Product Type: Service.Unit of Measure: Hour or Day.Cost Price.Sale Price.Costing Method: either Standard Price or Average Price.
When the Costing Method is Average Price in the Product form, you can have a button Update, beside the Cost Price field, that opens up a wizard for changing the cost price.
In summary, each company employee corresponds, in most cases, to:
- A
Partner. - A
Employeeform. - A
System User.
And each company job position corresponds to a Product.
By default, the hourly cost of an employee is given by the standard cost of the product linked to that employee. But if you install the hr_contract module, it is possible to manage contracts differently. The hourly cost of the employee is then automatically calculated from their employment contract when they enter their timesheet data.
To do this, the software uses a factor defined in the contract (for example, contract type, wages, working schedule, etc). Ideally, this factor should take into account the salary costs, taxes, insurances and other overheads associated with pay.
Define employee categories
You must create and assign employee categories for employees in order to be able to assign and manage leave and allocation requests by category. You can define employee categories from Human Resources > Configuration > Employee Tags. For a new category, define its name in Category. A category may also be assigned a Parent Category.

Example of categories defined for employees
To link an employee to a category, open the employee form through Human Resources > Human Resources > Employees. In the Tags, you can assign more than one category to an employee.

Assign categories to an employee in the Employee form
Now, when you create a new leave or allocation request from the menuitems under Human Resources > Leaves, if your Allocation Mode is By Employee Category, then you must choose a pre-defined Category. The request will then be applicable to all those employees who belong to the category selected. For example, you can create an allocation request for employees belonging to the Trainee category, entitling them to fewer leaves than the rest of the employees.
Define contract types
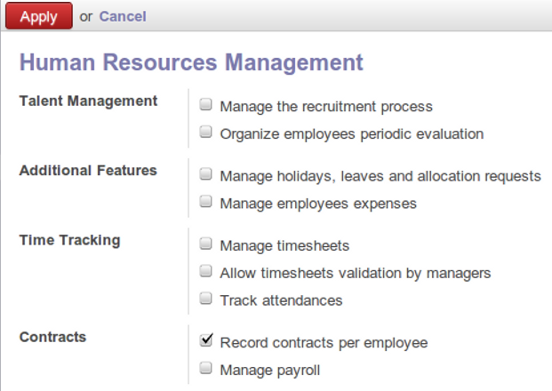
If you install the hr_contract module you can link contract details to the employee record. Go to the menu Settings > Configuration > Human Resources.And then tick the Record contracts per employee.

Install hr_contract
Define new contract types at Human Resources > Configuration > Contract > Contract Types

Contract Types list
Using Human Resources > Human Resources > Contracts you can create and edit contracts.

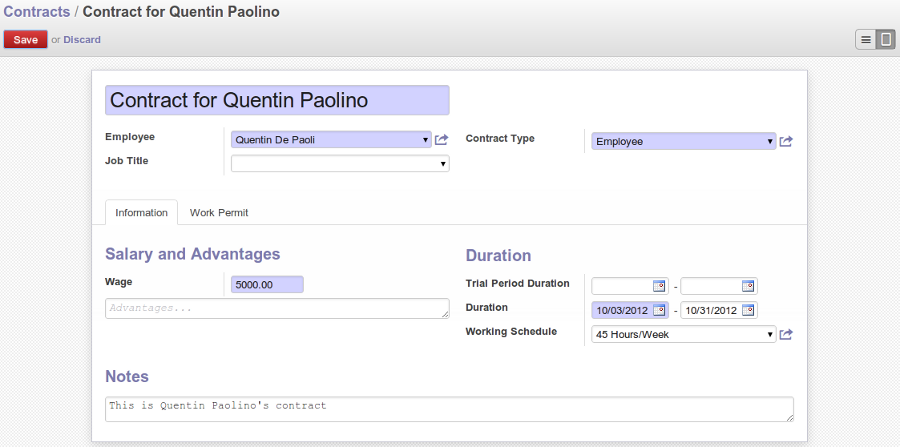
Definition of a working contract for a given employee
You can enter information about the employment contract for the employee, such as:
Employee: Employee for whom you want to define a contract.Job Title: Select job position.Contract Type: Select one from pre-defined contract types.Working Schedule: For example 45 Hours/Week.Duration: Start date and end date, since the employee started working where Start date is mandatory.Wage: Basic salary of the employee.- Trial Period Duration: Start date & End date for the contract trial period, if any.
Work Permit tab: Information regarding the Visa No, Visa Expire date and Work Permit No.
Manage attendance (Sign in / Sign out)
In some companies, staff have to sign in when they arrive at work and sign out again at the end of the day. If each employee has been linked to a system user, then they can sign into Odoo ERPOnline by clicking on the icon at top-right.

Sign In/Out
If an employee has forgotten to sign out on leaving, the system proposes that they sign out manually and type in the time that they left when they come in again the next day. This gives you a simple way of managing forgotten sign-outs.
Find employee attendance details from their forms in Human Resources > Human Resources > Employees.
To get the detail of attendances from an employee's form in Odoo ERPOnline, you can use the available reports:
- Attendances By Month.
- Attendances By Week.
- Attendance Error Report.
The last report highlights errors in attendance data entry. It shows you whether an employee has entered the time of entry or exit manually and the differences between the actual and expected sign out time and the sign in time.
The first and second report shows the attendance data for the selected month and week respectively.
