
Configuring Accounts from A to Z
Accounts have be configured to meet your company's needs. This chapter explains how to modify your chart of accounts, journals, access rights, initial account balances and default values for the initial configuration of your Odoo ERPOnline accounts.
Good accounting software requires great usability and simplicity of data entry, as well as flexibility in configuring its different components. You should be able to easily modify the accounting module to meet your own needs, so that you can optimise it for the way you want to use it.
Chart of Accounts
When configuring the software, Odoo ERPOnline allows you to choose predefined charts of accounts, which include all basic configuration, such as tax codes and fiscal positions. Of course, you can also define your own chart of accounts.
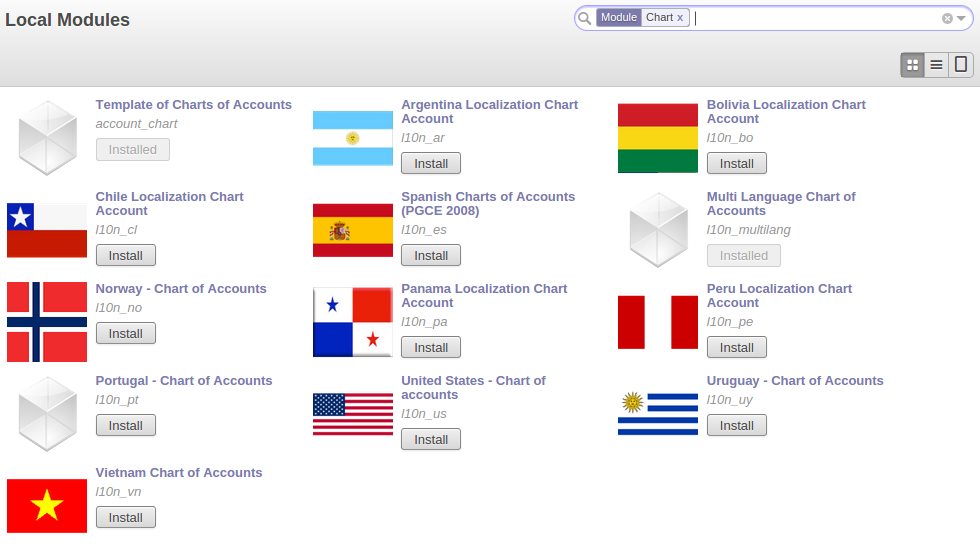
Using a Preconfigured Chart of Accounts
You can install a chart from the list of modules too. The module name will be like l10n_XX where XX represents your country code in two letters. For example, to get the chart of accounts for Belgium, go to Settings > Modules > Modules and install the module l10n_be.
Some of these pre-defined charts of accounts are comprehensive and accurate, others rather have a more tentative status and are simply indicators of the possibilities. You can modify these, or build your own accounts onto the default chart, or replace it entirely with a custom chart.
Set Your Accounting Options
Creating a Chart of Accounts
Start by creating Account Types, which determine the kind of account and the way in which accounts will be treated at financial year closing.
For Access the Account Type, you have to assign Technical Features from Settings > Users > Users, Access Right.
To add, modify or delete existing account types, go to the menu Accounting > Configuration > Accounts > Account Types.
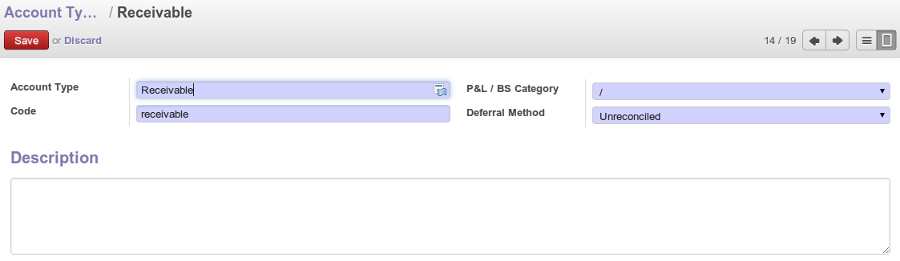
Defining Account Types
The fields used to define an account type are the following:
Account Type: the name of the account type.Code: the code of the account type.PL/BS Category: this category determines where in a report the account will be printed (i.e. Balance Sheet and Profit and Loss). There are five types you can use: No type at all (/), Balance Sheet (Assets Accounts = active), Balance Sheet (Liabilities Accounts = passive), Profit & Loss (Income) and Profit & Loss (Expense).Deferral Method: this field indicates how and whether the account will be transferred at financial year closing.Nonemeans that the account will not be transferred. Typically used for profit and loss accounts.Balancemeans that the account balance will be transferred at year closing. Typically used for balance sheet accounts.Detailmeans that every single entry will be transferred to the next financial year.Unreconciledmeans that only unreconciled (outstanding) entries will be transferred to the next financial year. Typically used for centralisation accounts.
Use the View type for accounts that make up the structure of the charts and have no account data inputs of their own. To add, modify or delete existing accounts, use the menu Accounting > Configuration > Accounts > Accounts.

Defining Accounts
The main account fields are:
Account Code and Name: the code length is not limited to a specific number of digits. Use code 0 to indicate the root account and the account name.Parent: determines which account is the parent of this one, to create the tree structure of the chart of accounts.Internal Type: internal types have special effects in Odoo ERPOnline. By default, the following types are available:Viewcan be used to create a hierarchical structure for your accounts (grouping),Regularany account that does not fit into one of the other types; most of the accounts will have this type,Receivable - Payable: these types are used to indicate the centralisation accounts (for customers and suppliers) that will be set for each partner,Liquidityused to indicate financial accounts (bank and cash accounts), Consolidation to create a virtual (or consolidation) chart of accounts, Closed to indicate accounts that are no longer used.- Account Type: it is important to select the corresponding account type, as explained above. This will have an impact at year closing and also when printing reports.
- Secondary Currency: forces all the moves for this account to have this secondary currency. Note that you can also define exchange rates from the menu
Accounting > Configuration > Miscellaneous > Currencies. Outgoing Currencies Rate: to be selected only when you add a secondary currency. You have two options for outgoing transactions: At Date or Average Rate. Incoming transactions are always calculated At Date, according to the date of the transaction.Allow Reconciliation: determines if you can reconcile the entries in this account. Activate this field for receivable and payable accounts and any other account that need to be reconciled other than by bank statements.Default Taxes: this is the default tax applied to purchases or sales using this account. It enables the system to propose tax entries automatically when entering data in a journal manually.
The tree structure of the accounts can be altered as often and as much as you wish without recalculating any of the individual entries. So you can easily restructure your account during the year to reflect the reality of the company better.
You can have a look at active charts of accounts using the menu Accounting > Charts > Chart of Accounts, and Open Charts for the selected year, account moves and periods. Click an account to drill down to its details.
Most accounting software packages represent their charts of accounts in the form of a list. You can do this in Odoo ERPOnline as well if you want to, but its tree view offers several advantages:
- It lets you show in detail only the accounts that interest you.
- It enables you to get a global view of accounts (when you show only summary accounts).
- It is more intuitive, because you can search for accounts on the basis of their classification.
- It is flexible because you can easily restructure them.
The structure of the chart of accounts is hierarchical, with account subtotals calculated from the View accounts. You can develop a set of view accounts to contain only those elements that interest you.
To get the details of the account entries that are important to you, all you need to do is click the account's code or name.
Displaying the chart of accounts can take several seconds, because Odoo ERPOnline calculates the debits, credits and balance for each account in real time.
Virtual Charts of Accounts
The structure of a chart of accounts is imposed by the legislation in effect in the country concerned. Unfortunately, that structure does not always correspond to the view that a company needs.
In Odoo ERPOnline, you can use the concept of virtual charts of accounts to manage several representations of the same accounts simultaneously. These representations can be shown in real time with no additional data entry.
So your general chart of accounts can be the one imposed by the statutes of your country, and your CEO can then have other virtual charts as necessary, based on the accounts in the general chart. For example, you can create a view per department, a cash-flow and liquidity view, or consolidated accounts for different companies.
The most interesting thing about virtual charts of accounts is that they can be used in the same way as the default chart of accounts for the whole organization. For example, you can establish budgets from your consolidated accounts or the accounts from one of your companies.
Virtual accounts enable you to provide different representations of one or several existing charts of accounts. Creating and restructuring virtual accounts has no impact on the accounting entries. You can then use the virtual charts with no risk of altering the general chart of accounts or future accounting entries.
Because they are used only to get a different representation of the same entries, they are very useful for:
- Consolidating several companies in real time.
- Reporting to a holding according to their chart of accounts.
- Depreciation calculations.
- Cash-flow views.
- Getting more useful views than those imposed.
- Presenting summary charts to other users that are appropriate to their general system rights.
So there are good reasons for viewing the impact of financial transactions through virtual charts, such as budgets and financial indicators based on special views of the company.
To create a new chart of accounts you should create a root account using the menu Accounting > Configuration > Accounts > Accounts. Your top level account should have a name, a code (different from any other code in your current chart), an Internal Type and Account Type View. Then you can choose your structure by creating other accounts of Account Type View as necessary. The Internal Type should be of the Consolidation type if you want to map accounts. Check your virtual structure using the menu Accounting > Charts > Charts of Accounts and select the corresponding chart in the drop-down list at the top of the screen.
To be able to map your virtual chart of accounts to your general chart of accounts, you have to set Internal Type as Consolidation. From the Consolidated Children you can then map accounts or make accounts consolidate. In the Consolidated Children, you can add View accounts or normal accounts. If you add a View account to the consolidated children, Odoo ERPOnline will automatically include all existing and future linked accounts.
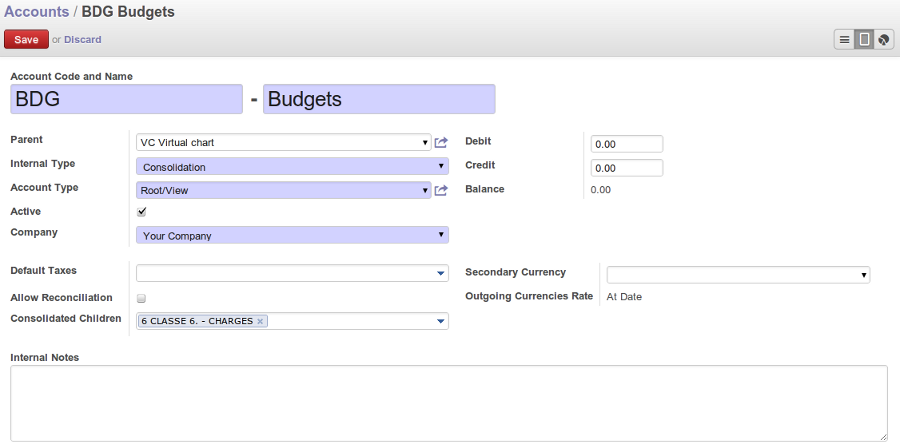
Virtual Accounts Mapped to View Account
You can then run reports such as Trial Balance and General Ledger for both your general chart of accounts and your virtual chart(s) giving you another representation of the company. All the actions and states in your general account are also available in the virtual accounts.
Finally, you can also make virtual charts of accounts from other virtual charts. That can give an additional dimension for financial analysis. You can create an unlimited number of virtual (consolidation) charts of accounts.
Periods and Financial Years
A fiscal year (or financial year) corresponds to twelve months for a company. In many countries, the fiscal year corresponds to a calendar year. That may not be the case in other countries.
The financial year can be divided into monthly or three-monthly accounting periods (when you have a quarterly declaration).
Odoo ERPOnline's management of the fiscal year is flexible enough to enable you to work on several years at the same time. This gives you several advantages, such as the possibility to create three-year budgets.
Defining a Period or a Financial Year
You can create several years in advance to define long-term budgets, use the menu Accounting > Configuration > Periods > Fiscal Years, click on Create enter the date of the first day and the last day of your fiscal year. Then, to create the periods, click one of the two buttons depending on whether you want to create twelve 1-month or four 3-months periods:

Defining a Financial Year and Periods
Odoo ERPOnline automatically creates an opening period to allow you to post your outstanding balances from the previous fiscal year. Notice the Opening/Closing Period checkbox for such a period.
To close a fiscal year you can also use the menu Accounting > Periodical Processing > End of Period > Close a Period.
Closing a Period
To close a financial period, for example when a tax declaration has been made, go to the menu Accounting > Configuration > Periods > Periods, Select those period(s) which you want to close and from top centered More button click on Close a Period then select Check this box and on Close Period button. You can also close period from form view of Periods by clicking on Close Period button.
The system administrator can re-open a period, which have been closed by mistake.
When a period is closed, you can no longer create or modify any transactions in that period. Closing a period is not obligatory, and you could easily leave periods open.
To close an accounting period you can also use the menu Accounting > Periodical Processing > End of Period > Close a Period.
Managing your Tax Structure
This section deals with statutory taxes and accounts which are legally required from the company:
- The taxation structure provided by Odoo .
You can attach taxes to transactions so that you can:
- Add taxes to the amount you pay or receive.
- Report on the taxes in various categories that you should pay the tax authorities.
- Track taxes in your general accounts.
- Manage the payment and refund of taxes using the same mechanisms Odoo ERPOnline uses for other monetary transactions.
Since the detailed tax structure is a mechanism for carrying out governments policies, and the collection of taxes so critical to their authorities, tax requirements and reporting can be complex. Odoo ERPOnline has a flexible mechanism for handling taxation that can be configured to meet the requirements of many tax jurisdictions.
The taxation mechanism can also be used to handle other tax-like financial transactions, such as royalties to authors based on the value of transactions through an account.
From the menu Accounting > Configuration > Taxes > Taxes you can define your tax structure. Note that when you use a predefined (localised) chart of accounts, taxes will be configured as well in most cases.
Odoo ERPOnline's tax system runs around three major concepts:
Tax Code(orTax Case), used for tax reporting, can be set up in a hierarchical structure so that multiple codes can be formed into trees in the same way as a Chart of Accounts. The Tax Codes structure is used to define your VAT return; it can be numeric and alphanumeric. You can define tax codes from the menuAccounting > Configuration > Taxes > Tax Codes.Taxes, the basic tax object that contains the rules for calculating tax on the transaction it is attached to, linked to the General Accounts and to the Tax Codes. A tax can contain multiple child taxes and base its calculation on those taxes rather than on the base transaction, providing considerable flexibility.- The
General Accounts, which record the taxes owing and paid. Since the general accounts are discussed elsewhere in this part of the book and are not tax-specific, they will not be detailed in this section.
You can attach zero or more Purchase Taxes and Sale Taxes items to products, so that you can account separately for purchase and sales taxes (or Input and Output VAT – where VAT is Value Added Tax). Because you can attach more than one tax, you can handle a VAT or Sales Tax separately from an Eco Tax on the same product.
To create a new Tax Code, use the menu Accounting ‣ Configuration ‣ Taxes ‣ Tax Codes. You should define the following fields:
Tax Case Name: a unique name required to identify the tax case, usually taken from your VAT return.Case Code: an optional short code for the case.Parent Code: a link to a parent Tax Code to create a tree structure which can be displayed from the menu Accounting > Charts > Chart of Taxes.Not Printable in Invoice: a checkbox allowing you to indicate that any taxes linked to the tax code concerned should not be printed on the invoice.Coefficient for parent: choose 1.00 to add the total to the parent account or -1.00 to subtract it.Description: a free text field for documentation purposes.

Tax Code
You can also see two read-only fields:
Period Sum: a single figure showing the total accumulated on this case for the current financial period.Year Sum: a single figure showing the total accumulated on this case for the financial year.
You will probably need to create two tax codes for each different tax rate that you have to define, one for the tax itself and one for the invoice amount (the so-called base code) the tax is computed from. And you will create tax codes that you will not link to any tax objects (similar to General Account View types) just to organise the tree (or hierarchical) structure.
To have a look at the structure you have constructed, you can use the menu Accounting > Charts > Chart of Taxes. This tree view reflects the structure of the Tax Codes and shows the current tax situation for the selected period, or for the complete financial year.
The Taxes defined are used to compute taxes on the transactions they are attached to, and they are linked to the corresponding General Accounts (usually VAT accounts) and to Tax Codes, both for the base amount and the tax amount.
To create a new Tax, use the menu Accounting > Configuration > Taxes > Taxes.

Defining Taxes
You define the following fields:
Tax Name: a unique name required for this tax (such as 21% Purchase VAT ).Tax Code: an optional code for this tax (such as VAT IN IC ).Tax Application: defines whether the tax is applicable to Sale, Purchase or All transactions.Tax Included in Price: when checked, the price shown in the product or invoice is inclusive of this tax.Tax Type: a required field indicating how tax should be calculated: Percentage, Fixed Amount, None, Balance or Python Code, (the latter is found in the Compute Code field in the Special Computation tab).Amount: a required field whose meaning depends on the Tax Type, being a multiplier of the base amount when the Tax Type is Percentageand a fixed amount added to the base amount when the Tax Type is Fixed Amount.Invoice Tax Account: a General Account used to record invoiced tax amounts, which may be the same for several taxes or split according to percentage so that one tax is allocated to one account.Refund Tax Account: a General Account used to record invoiced tax refunds, which may be the same as the Invoice Tax Account or, in some tax jurisdictions, has to be separated.Tax on Children: when checked, the tax calculation is applied to the output from other tax calculations specified in the Child Tax Accounts field (so you can have taxes on taxes), otherwise the calculation is applied to the base amount of the transaction.Include in base amount: when checked, the tax is added to the base amount and not shown separately, such as Eco taxes.Child Tax Accounts: other taxes that can be used to supply the figure for taxation.
You can use child taxes when you have a complex tax situation requiring several tax codes to be used.
The fields above apply the taxes that you specify and record them in the general accounts, but do not provide you with the information that your tax authorities might need. Use the Tax Definition tab, parts Tax Declaration: Invoices and Credit Notes to define to which tax codes the tax should be assigned:
- Account Base Code: tax code to record the invoiced amount (exclusive of taxes) the tax is calculated on.
- Account Tax Code: tax code to record the calculated tax amount.
- Refund Base Code: tax code to record the refund amount (exclusive of taxes) the tax is calculated on.
- Refund Tax Code: tax code to record the refund tax amount.
When you have created a tax structure consisting of taxe codes and taxes, you can use the taxes in your various business objects so that transactions can be associated with taxes and tax-like charges, such as Eco Taxes (Recupel and Bebat, for instance).
When you are retailing to end users rather than selling to a business, you may want to (or be required to) show tax-inclusive prices on your invoicing documents rather than a tax-exclusive price plus tax.
You can assign multiple taxes to a Product. Assuming you have set up the appropriate taxes, you would use the menu Sales > Products > Products to open and edit a Product definition, then:
- Select one or more Sale Taxes for any products that you might sell, which may include a Sales Tax or Output VAT and a Sales Eco Tax.
- Select one or more Purchase Taxes for any products that you might purchase, which may include a Purchase Tax or Input VAT and a Purchase Eco Tax.
Generally, when you make a purchase or sales, the taxes assigned to the product are used to calculate the taxes owing or owed.
You can also assign multiple taxes to an account, so that when you transfer money through the account you attract a tax amount. This principle can easily be used when posting purchase invoices for which no products are required.
Taxes on Products and Accounts will usually be national taxes. Odoo ERPOnline is capable of automatically converting national taxes to intracommunal or export taxes through the concept of Fiscal Positions.
Go to the menu Accounting > Configuration > Taxes > Fiscal Positions. You can use the fiscal positions to automatically convert national taxes to the required intracommunal or export taxes, according to the fiscal position specified for the customer or supplier.
Fiscal positions allow you to make a mapping from national taxes to intracommunal or export taxes, or to map your accounts according to these criteria. You can link fiscal positions to your customers and suppliers to ensure automatic and easy VAT conversion when posting entries.
Journals
All your accounting entries need to appear in an accounting journal. So you should create a Sales Journal for customer invoices, a Sales Refund journal for customer credit notes, a Purchase Journal for supplier invoices, a Purchase Refund journal for supplier credit notes and a Bank Journal for bank transactions.
Configuring a Journal
To view, edit or create new journals use the menu Accounting > Configuration > Journals > Journals.
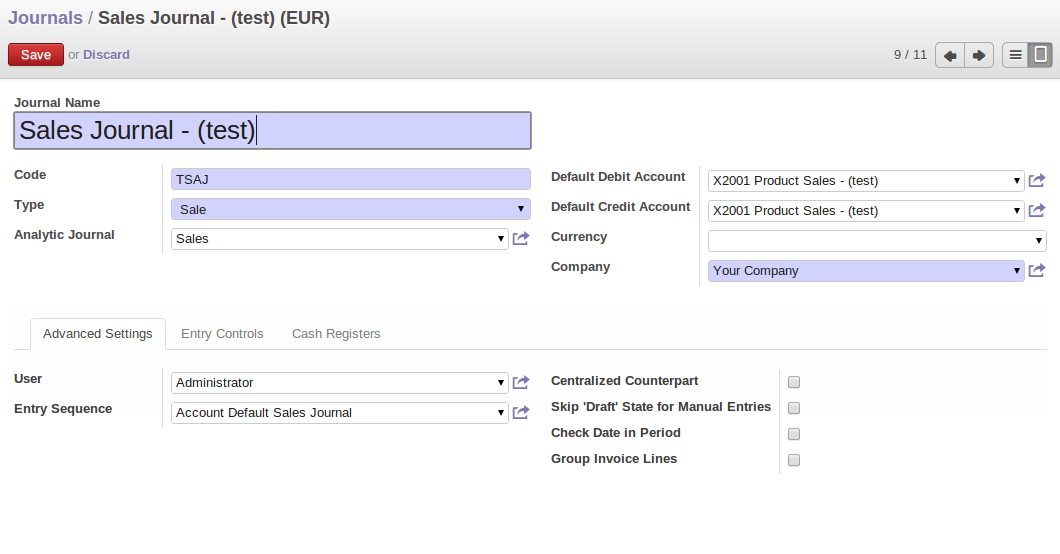
Defining an Accounting Journal
Blue fields are mandatory fields. When you select a journal type, some configuration parameters will be preset. The journal type will tell the system where the journal concerned can be used.
Each journal has a specific way of displaying data. The type of journal determines the journal view, which indicates the fields that need to be visible and are required to enter accounting data in that journal. The view determines both the order of the fields and the properties of each field. For example, the field Statement has to appear when entering data in the bank journal, but not in the other journals.
You can also create your own journal views. However, before creating a new view for a journal, check whether there is nothing similar already defined. You should only create a new view for new types of journals.
You can create a sequence for each journal. This sequence determines the automatic numbering for accounting entries. Several journals can use the same sequence if you want to define one for them all, and if your legislation allows this.
Sequences can also be created from the Settings > Technical > Sequences & Identifiers > Sequences. By default, Odoo ERPOnline has only one sequence in the journal definition. If you need two separate sequences to be kept for the journal, you can install the module account_sequence.
The default credit and debit account allow the software to automatically generate counterpart entries when you are entering data through Journal Items. In some journals, debit and credit accounts are mandatory. For example, in a bank journal you should put an associated bank account, so that you do not have to create counterparts for each transaction manually.
A journal can be marked as being centralised. When you do this, the counterpart entries will not be owned by each entry, but will be global for the given journal and period. You will then have a credit line and a debit line centralized for each entry in one of these journals, meaning that both credit and debit appear on the same line. This option is used when posting opening entries in a situation journal.
A bank journal can automatically be created from the bank account(s) you define for your company. Go to Accounting > Configuration > Accounts > Setup your Bank Accounts. Here you create the bank account or IBAN number of your company's bank account(s). Fill in the Bank Name, and when you save the entry, your Bank Journal will automatically be created with the Bank Name and the Account Number. The general ledger account for this bank will also be created for you.
Controls and Tips for Data Entry
You can have control on journals in Odoo ERPOnline – controls over the accounts.
To avoid entering account data in wrong accounts, you can put conditions on the general accounts about which journal can use a given account. To do this, you have to list all the accounts or valid account types in the second tab, Entry Controls. If you have not added any accounts there, OpenERP applies no restriction on the accounts for that journal. If you list accounts and/or the types of accounts that can be used in a journal, OpenERP prevents you from using any account or account type not in that list. This verification step starts from the moment you enter data. You can only select allowed accounts or account types.
This functionality is useful for limiting possible data entry errors by restricting the accounts to be used in a journal.
Control of Data Entry
In accounting it is not a good idea to allow a data entry directly from bank account A to bank account B. If you enter a transaction from bank A to bank B, the transaction will be accounted for twice.
To prevent this problem, pass the transaction through intermediate account C. At the time of data entry, the system checks the type of account that is accepted in the bank journal: only accounts that are not of type Bank are accepted.
If your accountant defines this control properly, non-accounting users are prevented from transferring payments from one bank to another, reducing your risks.
Payment Terms
You can define whatever payment terms you need in Odoo ERPOnline. Payment terms determine the due dates for paying an invoice.
To define new payment terms, use the menu Accounting > Configuration > Miscellaneous > Payment Terms and then click Create.
The figure below represents the following payment term: 5000 within 5 days, 50% payment at the last day of current month, Remaining on 15th of next month.
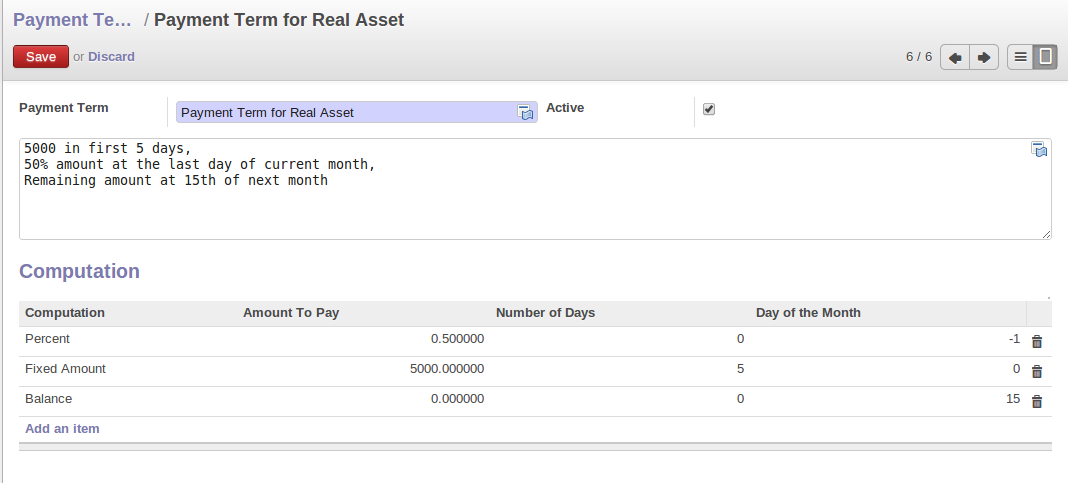
Configuring payment terms
To configure new conditions, start by giving a name to the Payment Term field. Text that you put in the field Description on invoices, is used on invoices, so enter a clear description of the payment terms there.
Then create individual lines for calculating the terms in the section Payment Term.
The Amount to pay field enables you to calculate the amount to pay for each line:
Percent: the line corresponds to a percentage of the total amount, the factor being given in Value Amount. The number indicated in Value Amount must take a value between 0 and 1.Fixed Amount: this is a fixed value given by the Value Amount box.Balance: indicates the balance remaining after accounting for the other lines.
Think carefully about setting the last line of the calculation to Balance, to avoid rounding errors. The highest sequence number is evaluated last.
The two last fields, Number of Days and Day of the Month, enable the calculation of the delay in payment for each line. The delay Day of the Month can be set to -1 , 0 or any positive number. For example, if today is 20th December 2012, and if you want to set payment terms like this:
5000 within 5 days: set Valuation Fixed Amount, Number of Days 5 and Day of the Month 0. That creates journal entry for date 25th December 2012.50% payment at the last day of current month: set Valuation Percent, Number of Days 0 and Day of the Month -1. That creates journal entry for date 31st December 2012.Remaining on 15th of next month: set Valuation Balance, Number of Days 0 and Day of the Month 15. That creates journal entry for date 15th January 2013.
You can then add payment terms to a Partner through the tab Accounting on the partner form.
Putting Analytic Accounts in Place
For the initial setup of good analytic accounts you should:
- Set up the chart of accounts.
- Create the different journals.
- Link the analytic journals to your accounting journals.
Setting up the Chart of Accounts
Start by choosing the most suitable analytic representation for your company before entering it into Odoo ERPOnline. To create the different analytic accounts, use the menu Accounting > Configuration > Analytic Accounting > Analytic Accounts and click the Create button. Note that the data you see when creating an analytic account will depend upon the business applications installed.
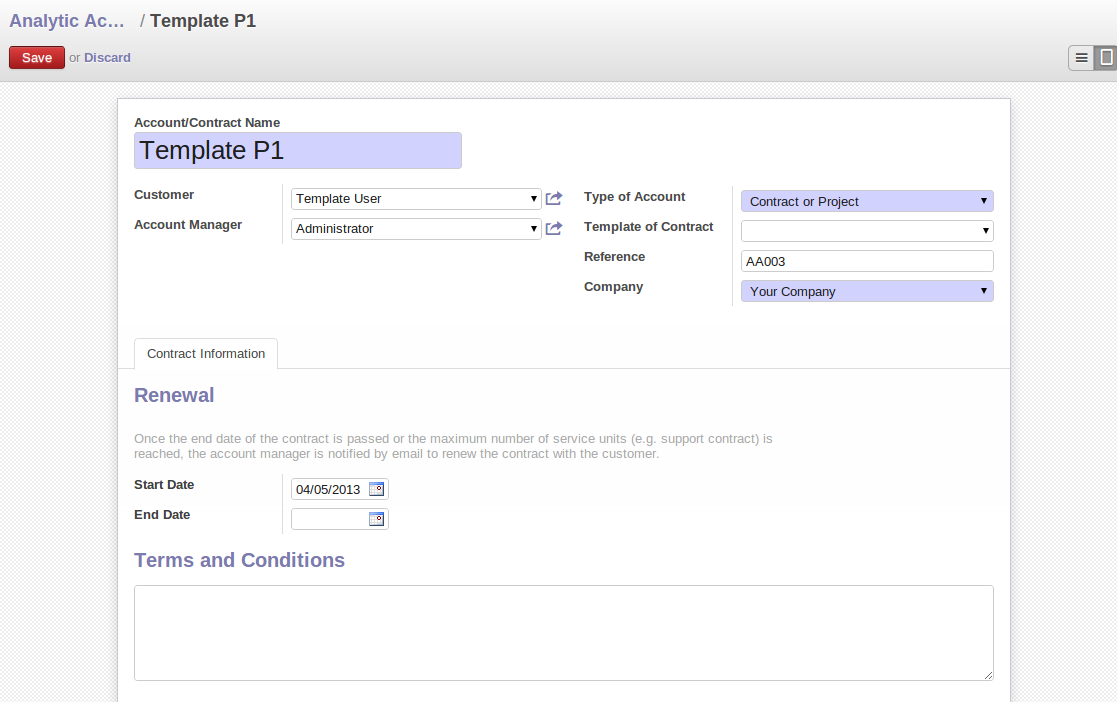
Setting up an Analytic Account
To create an analytic account, you have to complete the main fields:
- The
Account Name. - The
Reference: used as a shortcut for selecting the account. - The
Account Type: just like general accounts, the Analytic View type is used for virtual accounts which are used only to create a hierarchical structure and for subtotals, and not to store accounting entries. The Analytic Account type will be used for usual accounts that you only want to use in accounting. If you select Contract or Project, it offers you the possibility to manage the validity and the invoicing options for this account. The special type Template of Project allows you to define a template with default data that you can reuse easily. - The
Parent Analytic Account: use this field to define the hierarchy between the accounts.
If an analytic account (e.g. a project) is for a limited time, you can define a start and end date here.
The Maximum Time can be used for contracts with a fixed limit of hours to use.
You have several methods available to you in Odoo ERPOnline for automated invoicing:
- Service companies usually use invoicing from purchase orders, analytic accounts or project management tasks.
- Manufacturing and trading companies more often use invoicing from deliveries or customer purchase orders.
For more information about invoicing from projects, we refer to the book (soon to be released) about Project and Services Management.
Once you have defined the different analytic accounts, you can view your chart through the menu Accounting > Charts > Chart of Analytic Accounts. You can display analytic accounts for one or more periods or for an entire financial year.
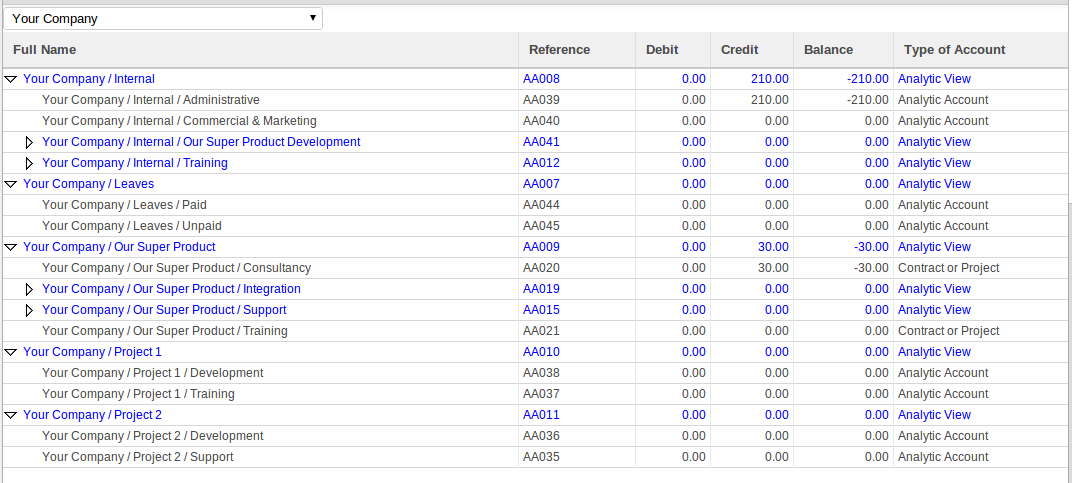
Analytic Chart of Accounts
Setting up an Analytic Account
The setup screen for an analytic account can vary according to the modules installed in your database. For example, you will see information about recharging services only if you have the module hr_timesheet_invoice installed.
Some of these modules add helpful management statistics to the analytic account. The most useful is probably the module account_analytic_analysis, which adds such information as indicators about your margins, invoicing amounts, and latest service dates and invoice dates.
Creating Journals
Once the analytic chart has been created for your company, you have to create the different journals. These journals enable you to categorise the different accounting entries by their type, such as:
- Services.
- Expense reimbursements.
- Purchases of materials.
- Miscellaneous expenditure.
- Sales.
At a minimum, you have to create one analytic journal for Sales and one for Purchases. If you do not create these two, Odoo ERPOnline will not validate invoices linked to an analytic account, because it would not be able to create an analytic accounting entry automatically.

Creating an Analytic Journal
To define your analytic journals, use the menu Accounting > Configuration > Analytic Accounting > Analytic Journals then click the Create button.
It is easy to create an analytic journal. Just give it a Journal Name, a Journal Code and a Type. The types available are:
- Sale, for sales to customers and for credit notes.
- Purchase, for purchases and expenses.
- Cash, for financial entries.
- Situation, to adjust accounts when starting an activity, or at the end of the financial year.
- General, for all other entries.
The analytic journal now has to be linked to your general journals to allow Odoo ERPOnline to post the analytic entries. For example, if you enter an invoice for a customer, Odoo ERPOnline will automatically search for the analytic journal of type Saleslinked to your Sales Journal. Go to Accounting > Configuration > Journals > Journals and select for instance the Sales journal. In the Analytic Journal select the analytic sales journal.
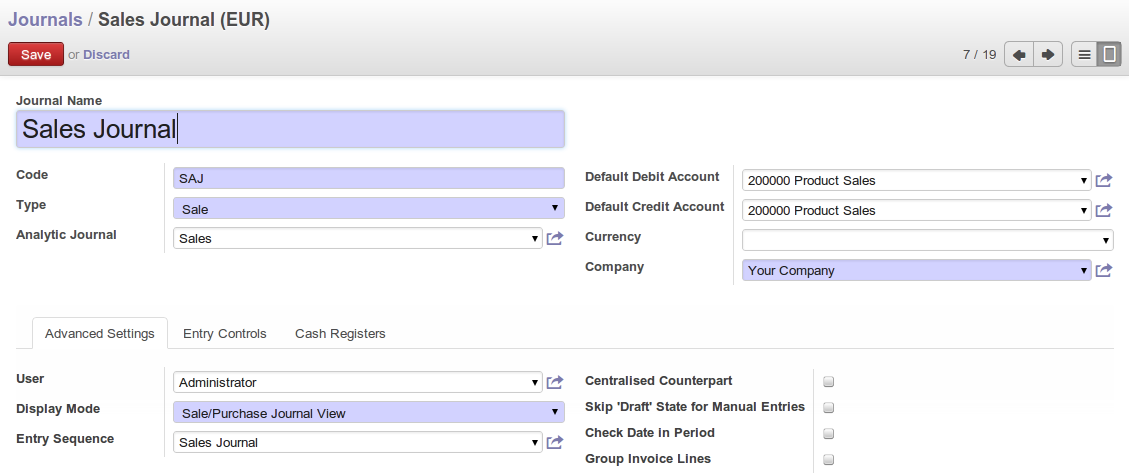
Linking an Analytic Journal to a Journal
Working with Analytic Defaults
You can work with analytic default accounts in Odoo ERPOnline by installing the account_analytic_default module. Notice that this module is also linked with the sale, stock and procurement modules.
The system will automatically select analytic accounts according to the following criteria:
- Product.
- Partner.
- User.
- Company.
- Date.
You can configure these criteria using the menu Accounting > Configuration > Analytic Accounting > Analytic Defaults and clicking the Create button. According to the criteria you define here, the correct analytic account will be proposed when creating an order or an invoice.
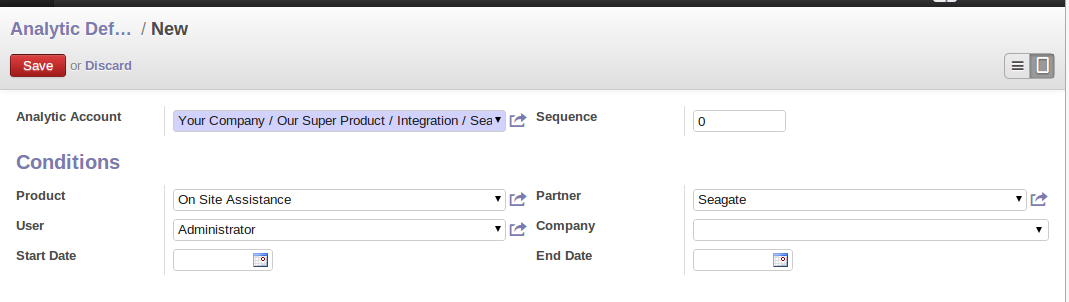
Specify Criteria to Automatically Select Analytic Account