
How does it apply to your Business?
You will work in this chapter on a minimal database containing no demonstration data, so that there is no confusion about what you created. You will keep the database you have created, to allow you to build on it throughout the rest of this book if you want to.
You will develop a real case through the following phases:
- Specify a real case.
- Describe the functional needs.
- Configure the system with the essential modules.
- Carry out the necessary data loading.
- Test the system with your database.
The case is deliberately simple to provide you with a foundation for the more complex situations you might have to handle in your company. Throughout this chapter, we assume that you access Odoo ERPOnline through its web interface. And it is also assumed (as in the rest of this book) that you are using ERPOnline or the latest download of Odoo, the stable production version at the time of writing (not the trunk version, which is likely to have new and potentially unstable features).
Business Example
In this example, you will configure a system that enables you to:
- Buy products from a supplier.
- Stock the products in a warehouse.
- Sell these products to a customer.
The system should support all aspects of invoicing, payments to suppliers and receipts from customers.
Basic Settings
For this business case, you will have to model:
- The suppliers and a supplier category.
- The customers and a customer category.
- Some products and a product category.
- An inventory.
- A Purchase Order.
- A Sales Order.
- Invoices.
- Payments.
To test the system, you will need at least one supplier, one customer, one product, a warehouse, a minimal chart of accounts and a bank account.
Driving a Purchase / Sales Flow
To familiarize yourself with the system workflow, you will test a purchase-sale workflow in two phases. The first consists of product purchase, which requires the following operations:
- Place a purchase order with Plumbing Component Suppliers for 10 Titanium Alloy Radiators at a unit price of 56.00.
- Receive these products at your Goods In.
- Generate a purchase invoice.
- Pay your supplier.
Following this, you will sell some of these products, using this sequence:
- Receive a sales order for 6 Titanium Alloy Radiators from Smith and Sons, sold at a unit price of 130.00.
- Dispatch the products.
- Invoice the customer.
- Receive the payment.
Purchase Order
To place a Purchase Order with your supplier, use the menu Purchases > Purchase > Quotations and click the Create button. Complete the following field:
- Supplier:
Plumbing Component Suppliers.
As you complete the Supplier field, Odoo ERPOnline automatically completes the Pricelist field from information it takes out of the Partner record. Enter the following information
- Product :
Titanium Alloy Radiator- type in part of this name then press the tab key to complete it, or click theSearch Moreat the end of the s to bring a search box. (if product is previously configured)
When you have selected a product on the product line, Odoo ERPOnline automatically completes the following fields from information it finds in the Product record:
Product UOM: the unit of measure for this product.Description: the detailed description of the product.Scheduled Date: based on the product lead time.Unit Price: the unit price of the product.Analytic account: if any account is specified then it will appear on the order line (it is not in this example).Taxes: applicable taxes defined in the partner, if specified, otherwise in the product, if specified (there are not any in this example).
You can edit any of these fields to suit the requirements of the purchase order at the time of entry. Change the:
- Quantity:
10. - Unit Price:
56.00.
Save the order line and close the Order Line window by clicking the Close button. You can then confirm the whole one-line order by clicking Save, which makes the form non-editable.
It is now in a state of Draft PO, Confirm that by clicking Confirm Button which corresponds to an approval from a manager or from Accounts within your own company and moves the order into Purchase Order state. Send by Email, with the help of this button you can Request for Quotation and mean while your Draft PO moves in to RFQ sentstate.
If you click the Incoming Shipments & Invoices tab you will see the delivery Destination is your own company's Stock location and Receive Invoice button show you the draft invoice was created from the order. It is not entirely obvious at this stage, but the invoice is in a draft state so it can be edited and, crucially, has no accounting impact yet: it is just ready for your accounting group to activate it.
Receiving Goods
After confirming the order, you would wait for the delivery of the products from your supplier. Typically this would be somebody in Stores, who would:
Open the menu
Warehouse > Receipts Operations. You could have clicked theReceiveButton to the top left of the Purchase Order form to reach the same screen, but this would confuse the purchasing role with the stores role. That Button is very useful during testing and training, however.When the Transfer window appears, select the name of the entry in the list (IN/00002) to display the Packing List itself – you would usually do a search for the supplier name or order number in a list that was larger than this – then click Receive to indicate that you are receiving the whole quantity of 10 units.
At this point you have accepted 10 units into your company, in a location that you have already seen.
Using the menu Purchases > Products > Products you can find the product Titanium Alloy Radiators with Quantity On Hand and Incoming 10. From the product form click on Stock by Location from More button, you can see the Quantity On Hand and Incoming Stock of this product in various locations.
Traceability in Double-entry
OpenERP operates a double-entry stock transfer scheme similar to double-entry accounting. Because of this you can carry out various analyses of stock levels in your warehouse, along with the corresponding levels in Partner Location at your Supplier. The double-entry system, analogous to that of accounting, enables you to keep track of stock movements quite easily, and to resolve any errors that occur.
Invoice Control
When you have received an invoice from your supplier (which would usually be sent to your Accounts department), go to the menu Accounting > Suppliers > Supplier Invoices to open a list of supplier invoices waiting for receipt. These invoices enable your Accounts Department to match the price and quantities ordered against the price and quantities on the supplier's invoice (and since it is not uncommon to receive an invoice showing details more favourable to the supplier than those agreed at the time of purchase, this is a useful function).
In this example, you created an invoice automatically when you confirmed the supplier's Purchase Order. That is because the Invoicing Control field on the order was set to From Order(the default option). Other options enable you to create invoices at the time of receiving goods or manually. The initial state of an invoice is Draft .
Now click the invoice for your order PO00001 to display its contents. You can compare the goods that you have recorded there with the invoice received from your supplier. If there is a difference, it is possible to change the order lines to, for example, add a delivery charge. Click Validate to confirm the invoice and put it into the Open state.
Accounting entries are generated automatically once the invoice is validated. To see the effects on your chart of accounts, use the menu Accounting > Charts > Chart of Accounts,then click Open Charts at the Chart of Accounts page to see that you have a debit of 560.00 in the Purchases account and a credit of 560.00 in the Payable account.
Paying the Supplier
Select the menu Accounting > Suppliers > Supplier Invoices and click on the Unpaid Filter from Search for a list of supplier invoices that have not yet been paid. Write the PO00001 in search text box, itself to find the invoice. In practice, you would search for the invoice by order number or, more generally, for invoices nearing their payment date.
Click on Pay button in the supplier invoice form. It opens the Pay Invoice window with a description of the payment.
Supplier and Date comes automatically from invoice. You need to just enter the Payment Method. After that, click on Pay button to post this entry.
Payment of an Invoice
The method described here is for companies that do not use their accounting system to pay bills – just to record them. If you are using the account module with all its features, other, more efficient, methods let you manage payments, such as entering account statements, reconciling paperwork, using tools for preparing payments, interfacing with banks.
You can monitor the accounting impact of paying the invoice through the chart of accounts available from the menu Accounting > Charts > Chart of Accounts. OpenERP automatically creates accounting entries from the payment, and can reconcile the payment to the invoice. You now have a new transaction that has debited the Payable account with 560.00 and credited the Cash account.
If you look in Accounting > Journal Entries > Journal Entries you will see both accounting transactions, one in each of the Purchase Journal and Bank Journal in Draft state.
From Sales Proposal to Sales Order
In Odoo ERPOnline, sales proposals and sales orders are managed using documents that are based on the same common functionality as purchase orders, so you will recognize the following documents in general but see changes to their detail and to their workflows. To create a new sales proposal, use the menu Sales > Sales > Quotations and click on Create button which creates a new order in a state of Draft Quotation , then:
- Select the Customer
Smith and Offspring. This has the effect of automatically completing several other fields:Ordering Contact,Invoice Address,Shipping Address, and thePricelistPublic Pricelist (EUR). They are all only defaults, so these fields can be modified as you need.- Click the
Add an iteamlink inSales Order Linessection to open aSales Order Lineswindow.- Select the product
Titanium Alloy Radiator. Although theProductfield is not itself required, it is used by Odoo ERPOnline to select the specific product so that several other fields can be automatically completed on the order line of the proposal, such asDescription,Unit of Measure,Unit PriceandTaxes.- Change the
Quantity(UoM) to 6 and theUnit Priceto 130.00. Then clickSave & Closeand the line appears on the quotation form.- On the
Other Informationtab of this Sales Order, select aShipping Policyof Deliver all products at once andCreate Invoiceof On Delivery Order from their dropdown menu lists. you can also define default Invoicing Method, use the menuSettings > Configuration > Salesunder Invoicing Process set The default invoicing method is Invoice based on deliveries.- Go back to the Quatation and validate the document by clicking
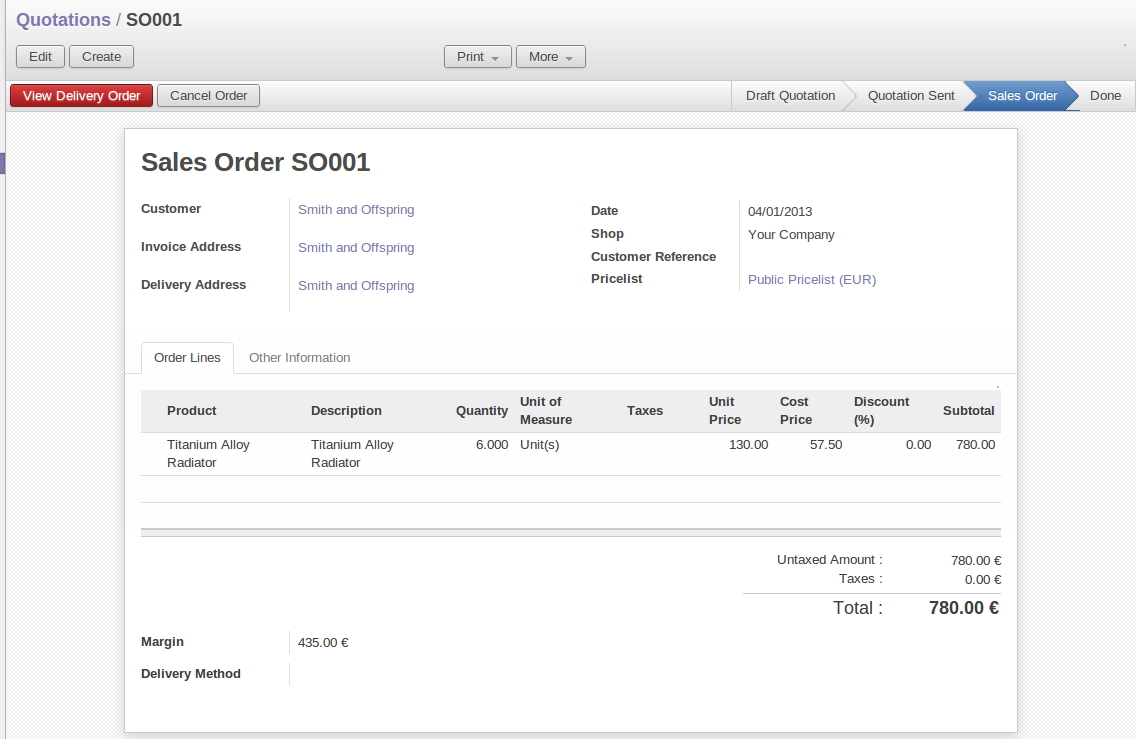
Confirm Salewhich calculates prices and the changes the order's state from Quotation to Sale Order as shown in screenshotSales OrderForm. If you were in negotiation with the prospective customer, you would keep clickingSave, keeping the document in Quotation state for as long as necessary.
Sales Order Form
- By clicking
View Delivery Orderbutton, you can see thePicking Listthat has been created and you will be able to see any invoices that relate to this order when they are generated.
Go to Sales > Products > Products to display a list of products: just the one, Titanium Alloy Radiator, currently exists in this example. Its Real Stock still shows 10.00 but its Virtual Stock now shows 4.00 to reflect the new future requirement of 6 units for dispatch.
Preparing Goods for Shipping to Customers
The stores manager selects the menu Warehouse > Receive/Deliver Operations to get a list of orders to dispatch. For this example, find the Delivery Order related to the sale order which you have created.
Running Schedulers
At the moment, your Sales Order is waiting for products to be reserved to fulfil it. A stock reservation activity takes place periodically to calculate the needs, which also takes customer priorities into account. The calculation can be started from the menu Warehouse > Schedulers > Run Schedulers. Running this automatically reserves products.
If you do not want to have to work out your stock needs but have a lean workflow you can install the mrp_jit (Just In Time) module.
Although Odoo ERPOnline has automatically been made aware that items on this order will need to be dispatched, it has not yet assigned any specific items from any location to fulfil it. It is ready to move 6.00 Titanium Alloy Radiators from the Stock location to the Customers location, so start this process by clicking Check Availability. The Move line has now changed from the Confirmed state to the Available state.
Then click the Transfer button to reach the Products to Move window, where you click the Apply button to transfer the 6 radiators to the customer.
To analyze stock movements that you have made during these operations, use Warehouse > Products > Products and find this product, then click on the On Hand which is at the right most side to see that your stocks have reduced to 4 radiators and the generic Customers location has a level of 6 radiators.
Invoicing Goods
Use the menu Accounting > Customers > Customer Invoices to open a list of Sales invoices generated by Odoo ERPOnline. If they are in the Draft state, it means that they do not yet have any presence in the accounting system. You will find a draft invoice has been created for the order SO00001 once you have dispatched the goods because you had selected Invoice based on deliveries .
Once you validate an invoice, Odoo ERPOnline assigns it a unique number, and all of the corresponding accounting entries are generated. So open the invoice and click Validate to do that and move the invoice into an Open state with a number of SAJ/2013/002.
You can send your customer the invoice for payment at this stage. Print Invoice by Click Print or Invoice link from Print button to get a PDF document that can be printed to the customer.
Review your chart of accounts to check the impact of these activities on your accounting. You will see the new revenue line from the invoice.
Customer Payment
Registering an invoice payment by a customer is essentially the same as the process of paying a supplier. From the menu Accounting > Customers > Customer Invoices, click the name of the invoice that you want to mark as paid:
- Use the
Register Paymentbutton which opens a new window Pay Invoice.- Select the
Payment Method, for this example select Bank(EUR) then Pay the entry.
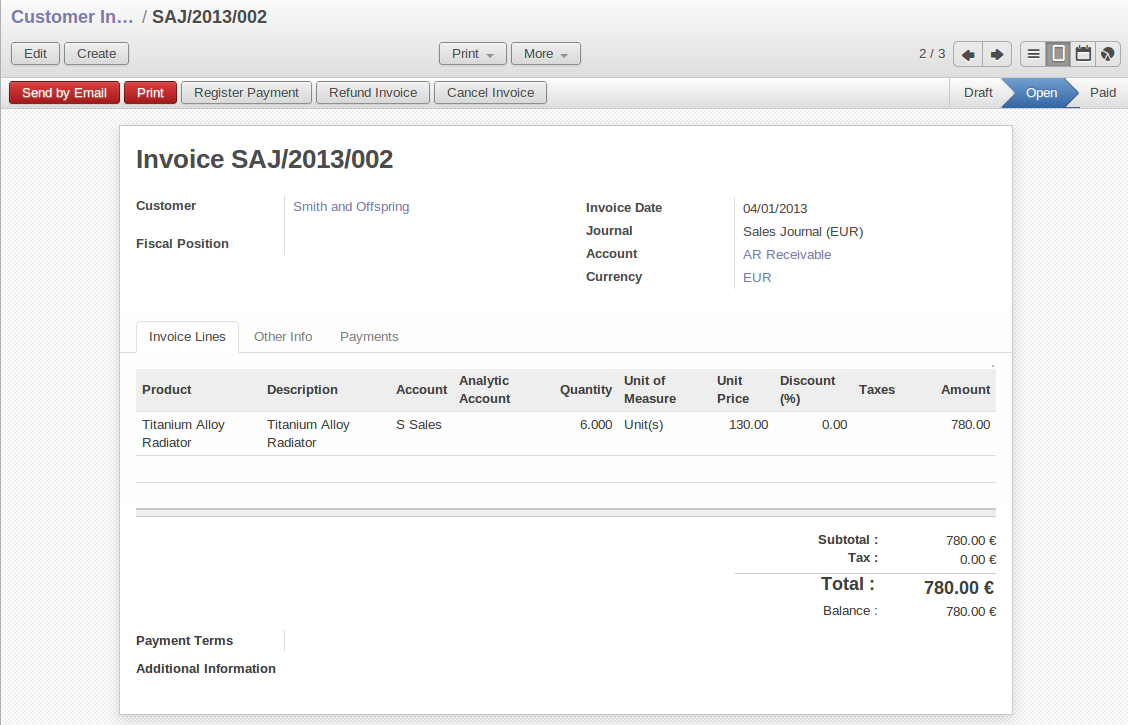
Invoice Form
Check your Chart of Accounts as before to see that you now have a healthy bank balance in the Cash account.