
Driving your Marketing Campaigns
Lead Automation with Marketing Campaigns
Odoo ERPOnline offers a set of modules allowing you to easily create and track your Marketing Campaigns. With the Marketing application, you define your direct marketing campaigns, allowing you to automate your lead communication. You can install it by installing the marketing module from the list of modules.
Campaigns can be displayed in List or Diagram view. The Diagram view allows you to clearly see the marketing actions (represented by a node) and the applied conditions (represented by an arrow).
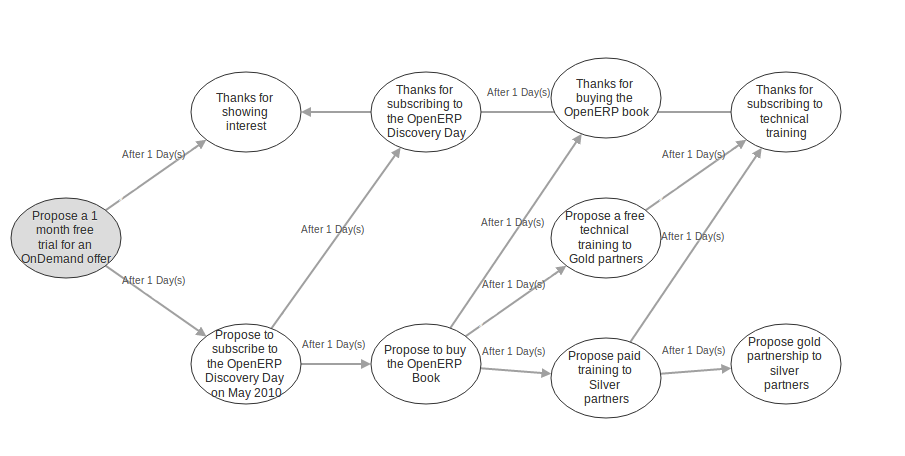
Diagram View of a Campaign
A marketing campaign is an event or an activity that will help you manage and reach your partners with specific messages. A campaign can have many activities that will be triggered from a specific situation, for instance a response from a contact to an email you sent. The result of such a response (action) could be the sending of an email, for which a template has previously been created in Odoo ERPOnline. To use the email functionality, you have to configure your email account.
Example of a Complete Marketing Campaign
Suppose we are an insurance company that wants to launch a marketing campaign to generate new leads. The company launches a campaign on its website and proposes potential customers to get a free offer for their car insurance.
Each time a customer registers himself through the contact form, a lead is created in Odoo ERPOnline. For further information about web contact forms, please refer to the chapter Automating your Lead Acquisition.
The salesperson responsible for Car Insurances triggers the marketing campaign by sending an introductory email of all the insurance services we offer and thanking for subscribing for the free Car Insurance Offer.
Based on the response, the insurance company plots whether the lead is interested in:
- Buying a Car Insurance.
- Information about other Insurance policies.
- Buying the book about Keeping your Children Safe.
According to the replies we receive from the leads, we send an email catering their respective needs.
- If they respond back to such an email, the lead is converted into an opportunity. When the lead buys a car insurance, the lead becomes our partner and is created as a customer in Odoo ERPOnline.
- If we do not receive an answer, they get a reminder regarding the offer a week later. If they still do not answer, our salesperson gives a voluntary call to ask about their needs.
See it as a flowchart allowing us to trigger a respective activity for every possible cue. The chances of leads going unattended become very low, and for every lead, we have a predefined method of handling it.
Moreover, we can measure the method according to our goals. Based on the goals we can evaluate the effectiveness of our campaign and analyze whether there is room for improvement.
Campaign Example
To a get an example of a complete campaign in Odoo ERPOnline, you can install the marketing_campaign_crm_demo module or you can also go to Settings > Configuration > Marketing tick the Marketing Campaigns and Demo Data for Marketing Campaigns then click on Apply
Designing your Campaigns
Designing a marketing campaign is mostly a long term process and the success of any campaign depends on the research and the effectiveness in selecting your target audience for the campaign. There are certain questions that every marketeer always asks while designing a campaign.
- What would be our marketing campaign?
- Who would be the target audience?
- How would we measure the effectiveness of our campaign?
The Odoo ERPOnline campaign is based on the principle of lead automation. A lead is created according to a specific response by a customer towards a stimulus. An example: filling the car insurance calculator on your website may create a lead in Odoo ERPOnline.
The first step is to define the campaign, i.e. the sequence of steps to be performed. By defining the campaign, we trigger a set of activities in the Marketing Campaign application of Odoo ERPOnline.
From the lead automation, we define the sequence of steps we ought to follow, the modes of creating and processing these activities and the cost involved in this campaign. After each activity and based on its respective stimuli, we can trigger the next event of the campaign concerned.
Segmenting your Campaigns
The two most important points for any successful campaign are the adoption of a concrete methodology of execution and choosing the right segment: a target loop of customers to whom our campaign would be directed (i.e. your target audience). Inappropriate focus on the wrong segment would result in the campaign being misfired and our efforts would reach deaf ears.
Through the Segment in the Campaign module, we can define our segment for each Campaign activity. Indeed, it is perfectly well possible that with every step downwards, the segment gets narrowed in terms of number. You can also synchronize the entire campaign steps according to the defined segments.
Our insurance company wants to attack the Spanish market, and will define a segment called Spanish Leads. Of course you would want your segment to be valid for leads coming from Spain only. To achieve this, go to the Leads list view. Filter all the leads for Spain (type Spain in the Search box and filter by country), make sure to uncheck the salesteam, so that all leads coming from Spain will be selected. Then click Save Filter in Custom Filters and call it for instance Spanish Leads. Now return to the Campaigns menu and open the Segment, then click the Filter field to select Spanish Leads. The segment will now only apply to Spanish leads.
As you can see, the Marketing Campaign module is closely synchronized with the Customer Relationship Management Business Application. Let us consider the segment we cater in the campaign as Leads in Odoo ERPOnline. Goals are set for each campaign, which would be considered as a desired state. Once a lead meets our objective criteria of goals, we change the lead status by converting it into an Opportunity, meaning that we should give focused attention.
Once the lead satisfies our final objective, we would consider it as a partner/customer and close that lead.
Email Templates
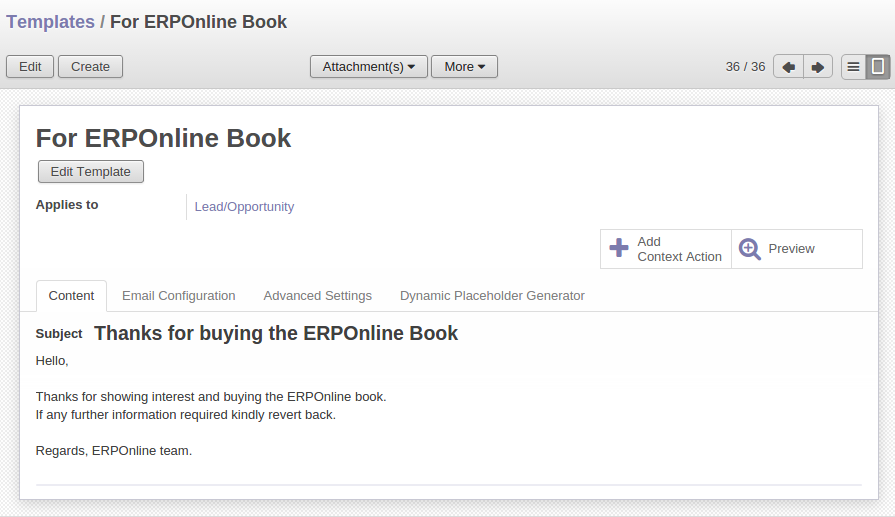
Email Template
Odoo ERPOnline allows you to create your own email templates. You can configure your email template(s) from the Settings > Technical > Email > Template. You can use the Expression Builder to have the variables created for you. Suppose you would like to add the Contact Name in the email, but of course, this will be a different name for each email.
In the Dynamic Value Builder, in Field, select Contact Name. Automatically, the Placeholder Expression will be filled. Copy the value from the expression and paste it in your email, e.g. Dear ${object.contact_name}. So your email will start with Dear followed by the name of the contact. This way you automatically create personalized emails.
For each email template, you can have Odoo ERPOnline generate a Action / Button that will be related to the object. So if you choose to do marketing campaigns for leads click on Add context action button of Email template form, the action will be added to the top panel of the Lead form.
Configuring Marketing Campaigns
Please notice that it requires some technical knowledge to configure Marketing Campaigns. To be able to see, create, edit campaign, users need to be in the Marketing / User group.
Setting up your Marketing Campaigns

Marketing Campaign
Introduction
A campaign defines a workflow of activities that items/objects entering the campaign will go through. Items are selected by segments. Segments are automatically processed every few hours and inject new items into the campaign, according to a given set of criteria. It is possible to watch the campaign as it is running, by following the campaign "workitems". A workitem represents a given object/item passing through a given campaign activity. See it as a step that still can go either way. Workitems are left behind when the item proceeds to the next activities. This allows an easy analysis and reporting on the running campaign. Each activity may execute an action upon activation depending on a dynamic condition. When the condition is not met, the workitem is cancelled/deleted; if the condition is met, the action is executed, the workitem is marked as Done, and propagated to the next activities.
Campaigns
Each campaign is made of activities and transitions, and must be defined on any specific object the system knows about (e.g. Leads, Opportunities, Employees, Partners). A campaign can be in one of 4 modes
Test Directly: processes the whole campaign in one go, ignoring any delay put on transitions, and does not actually execute the actions, so the result is simply the set of corresponding campaign workitems (see below). Any time a segment adds new items in the campaign they will be processed in the same manner.Test in Real time: processes the campaign but does not actually execute the actions, so the result is simply the set of corresponding campaign workitems. Any time a segment adds new items in the campaign they will be processed in the same manner.Manual confirmation: No action will be executed automatically, a human intervention is needed to let workitems proceed into the flow. It is like a step-by-step manual process using the Campaign Followup menu. You can ignore the time delays and force any step of the campaign, implementing the campaign at your pace i.e. (you have a test email and want to see if the steps and templates do exactly what you want them to do). You will see that the actions set are defined as To Do and Done and the page has to be refreshed to see the next activities defined by the campaign node: the campaign sends real messages to the actual targets, be warned.Normal: the campaign is processed normally, all actions are executed automatically at the scheduled date. Pay attention that in this status, the campaign sends real messages to the actual target audience.
Regardless of the current mode of the campaign, any workitem can be manually executed or cancelled at any time (even if it is scheduled in the future) through Campaign Followup.
Resource
Specifies where the campaign will get the information from, i.e. the OpenERP object linked (e.g. Leads, Opportunities, Employees, Partners).
Activities
Activities are steps in the campaign. Each activity is optionally linked to previous and next activities through transitions. Each activity has:
- One optional condition that stops the campaign.
- One action to be executed when the activity is activated and the condition is True (could be a 'do nothing' action).
- One optional signal (ignore it).
- A start flag.
Start Activity
Activities that have the Start checkbox set, will receive a new workitem corresponding to each new resource/object entering the campaign. It is possible to have more than one Start Activity, but not less than one.
Activity Conditions
A Boolean expression, made of clauses combined using boolean operators: AND, OR, NOT] Each condition is the criterion that decides whether the activity is going to be activated for a given workitem, or just cancelled. It is an arbitrary expression composed of simple tests on attributes of the object, possibly combined using or, and & not operators.
The individual tests can use the "object" name to refer to the object/resource it originates from (e.g the lead), using a "dot notation" to refer to its attributes. Some examples on a CRM Lead resource:
object.name== 'Insurance Offer Lead' would select only leads whose title is exactly "Insurance Offer Lead".object.state== 'pending' would select Pending leads only.object.country_id.code== 'be' would select leads whose country field is set to Belgium.object.country_id.name== 'Belgium' would select leads whose country field is set to Belgium.
Tests can also use a 'workitem' name to refer to the actual item denoting the position of the object in the campaign. This can be useful to access some specific attributes, such as the segment that selected this item. Some examples:
workitem.segment_id.name== 'Insurance Offer EU Zone1 - Industry Consulting/Technology' would select leads that entered this campaign through the "Insurance Offer Lead EU Zone1 - Industry Consulting/Technology" segment.'EU Zone1'in workitem.segment_id.name would select only leads that entered the campaign through a segment that has "EU Zone1" in its name.
Guidelines for Creating a Campaign
- It is a good idea to have an initial activity that will change some fields on the objects entering the campaign to mark them as such, to avoid mixing them in other processes (e.g. set a specific state and Sales Team on a CRM lead being processed by a campaign). You can also define a time delay so that the campaign seems more human (note if the answer comes in a matter of seconds or minutes it is computer generated).
- Put a stop condition on each subsequent activity in the campaign to get items out of the campaign as soon as the goal is achieved (e.g. every activity has a partial condition on the state of the item, if CRM Leads stops being Pending, the campaign ends for that case).
Email Templates
Email templates are composed of the following information:
- The Email headers: to, from, cc, bcc, subject.
- The raw HTML body, with the low-level markup and formatting.
- The plaintext body.
Headers and bodies can contain placeholders for dynamic contents that will be replaced in the final email with the actual content.
Campaign Segments
Segments are processed automatically according to a predefined schedule set in the menu Setting > Technical > Automation >Scheduled Actions. It could be set to process every 4 hours or every minute for example. This is the only entry point in a campaign at the moment.
Segment filters
Segments select resources via filters, exactly the same kind of filter that can be used in advanced search views on any list in Odoo ERPOnline. You can actually create them easily from any Odoo ERPOnline screen allowing you to save filters. Save your advanced search criteria as a new filters and add them to the segment in the Filter field. Filters mainly consist in a domain expressing the criteria of selection on a model (the resource).
Pushing your Campaign Results further
Of course, Marketing Campaigns can only be effective when you also do something with the results. Odoo ERPOnline offers analysis features to help you better manage future campaigns based on the outcome of past campaigns. Learning from your results, that is.
The Reporting > Marketing > Campaign Analysis report allows you to analyse your campaigns in detail, both ongoing and completed campaigns.
Segments allow you to keep good track of the results of a marketing campaign. You can see from which segment you have most demands, for instance.
Thanks to good insights in the way your respondents answer to your campaign, you can continuously improve your marketing results!
Automating your Lead Acquisition
Through your website, your company wants to get as much information as possible about the people who visit the website. But how can you make sure that every person who wants to know more about your company is actually registered somewhere?
Well, you could use a Contact form for this. And precisely such a form allows you to register contacts automatically in Odoo ERPOnline. By creating a link from your website's Contact form to Odoo ERPOnline, your contact data will automatically be created in the CRM (or any other application of your choice, such as HR).
Let us show you an example of how this can be achieved. The figure below shows a Contact form on a website.
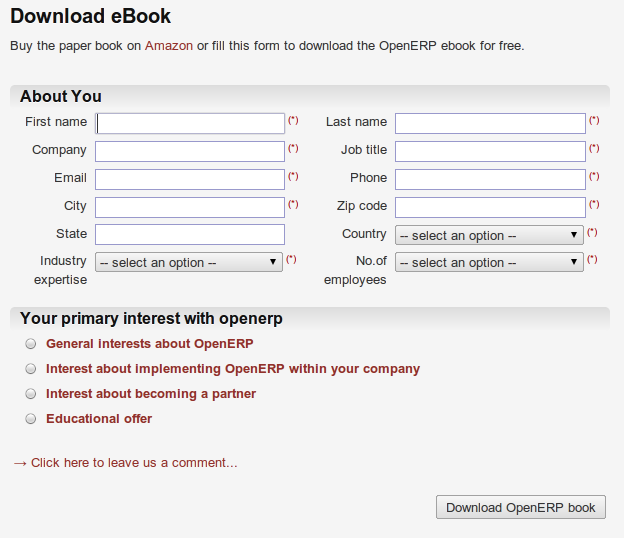
Contact Form on your Website
All data entered in this form are linked to the Lead form in the CRM. Each time someone enters this contact form, a new lead is automatically created in Odoo ERPOnline. Such a system is a very easy yet flexible way of keeping track of your leads and automatically launch your marketing campaigns.
How to Link a Web Contact Form to Odoo ERPOnline?
Odoo ERPOnline is accessible through XML-RPC interfaces, for which libraries exist in many languages.
Python example
import xmlrpclib # ... define HOST, PORT, DB, USER, PASS url = 'http://%s:%d/xmlrpc/common' % (HOST,PORT) sock = xmlrpclib.ServerProxy(url) uid = sock.login(DB,USER,PASS) print "Logged in as %s (uid:%d)" % (USER,uid) # Create a new lead url = 'http://%s:%d/xmlrpc/object' % (HOST,PORT) sock = xmlrpclib.ServerProxy(url) args = { 'name' : 'A New Lead', 'description' : 'This is a new lead from the web contact form', 'inventor_id': uid, } lead_id = sock.execute(DB,uid,PASS,'crm.lead','create',args)
PHP Example
<? include('xmlrpc.inc'); // Use phpxmlrpc library, available on sourceforge // ... define $HOST, $PORT, $DB, $USER, $PASS $client = new xmlrpc_client("http://$HOST:$PORT/xmlrpc/common"); $msg = new xmlrpcmsg("login"); $msg->addParam(new xmlrpcval($DB, "string")); $msg->addParam(new xmlrpcval($USER, "string")); $msg->addParam(new xmlrpcval($PASS, "string")); resp = $client->send($msg); uid = $resp->value()->scalarval() echo "Logged in as $USER (uid:$uid)"
// Create a new lead $arrayVal = array( 'name'=>new xmlrpcval("A New Lead", "string") , 'description'=>new xmlrpcval("This is a new lead from the web contact form" , "string"), 'inventor_id'=>new xmlrpcval($uid, "int"), );
$msg = new xmlrpcmsg('execute'); $msg->addParam(new xmlrpcval($DB, "string")); $msg->addParam(new xmlrpcval($uid, "int")); $msg->addParam(new xmlrpcval($PASS, "string")); $msg->addParam(new xmlrpcval("crm.lead", "string")); $msg->addParam(new xmlrpcval("create", "string")); $msg->addParam(new xmlrpcval($arrayVal, "struct")); $resp = $client->send($msg); ?>
Profiling your Customers
The segmentation tools let you create partner groups (or categories) and act on each segment differently according to questionnaires. For example, you could create pricelists for each of the segments, or start phone marketing campaigns by segment. To allow you to work with segments in OpenERP, you should install the crm_profiling module, which can also be achieved from Setting > Configuration > Marketing tick the Track customer profile to focus your campaigns
Profiling can be used to qualify your customers according to a questionnaire you define. When you establish a good customer profile, this will surely help you to close your deals. Customer profiles might even help you beat your competitors!
Establishing the Profiles of Prospects
During presales activities it is useful to qualify your prospects quickly. You can ask a series of questions to find out what product / service to offer to the customer, or how quickly you should handle the request.
This method of rapidly qualifying prospects is often used by companies who carry out presales by phone. A prospect list is imported into the Odoo ERPOnline system as a set of partners and the operators then ask a series of questions to each prospect by phone.
Responses to these questions enable each prospect to be qualified automatically which leads to a specific service being offered based on their responses.
As an illustration, take the case of a software company which offers a service based on the Odoo ERPOnline software. The company goes to several exhibitions and encounters dozens of prospects over a few days. It is important to handle each request quickly and efficiently.
The products offered at these exhibitions are:
- Training on Odoo ERPOnline – for independent people or small companies.
- Partner contract – for IT companies that intend to offer an Odoo ERPOnline service.
- Odoo ERPOnline as SaaS – for small companies.
- A meeting in conjunction with a partner to provide a demonstration aimed at providing a software integration – for companies that are slightly larger.
The IT company has therefore put a decision tree in place based on the answers to several questions to prospects. These are given in the following figure
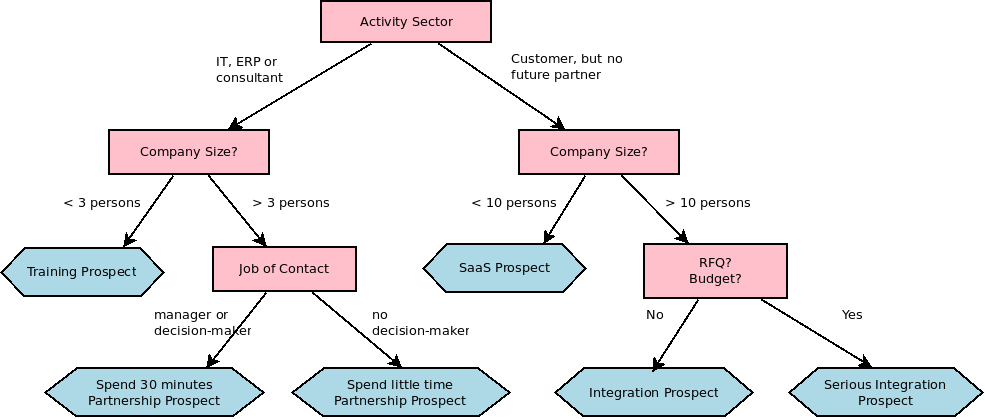
Example of Profiling Customer Prospects by the OpenERP Company
The sales person starts by asking the questions mentioned above and then after only a couple of minutes of work, he can decide what to propose to the prospective customer simply by analysing the prospect's answers.
At the end of the exhibition, prospects' details and their responses to the questionnaire are entered into Odoo ERPOnline. The profiling system automatically classifies the prospects into appropriate partner categories.
This enables your sales people to efficiently follow up prospects and adapt their approach according to each prospect's profile. For example, they can send a letter based on a template developed for a specific partner category. They would use Odoo ERPOnline's report editor and generator for their sales proposition, such as an invitation to a training session a week after the show.
Using Profiles effectively
To use the profiling system, you have to install Odoo ERPOnline's crm_profiling module. You can also use the Setting > Configuration > Marketing tick the Track customer profile to focus your campaigns
Once the module is installed, you can create several questionnaires through the menu Sales > Configuration > Questionnaires. For each questionnaire, Odoo ERPOnline allows you to create a list of questions and the possible responses through the menu Sales > Configuration > Questions.
To obtain the scheme presented earlier you can create the following questions and responses:
| Questions | Possible Responses |
|---|---|
| Journalist ? | Yes / No |
| Industry Sector ? | T / ERP Consultant / Services / Industry / Others |
| Number of Staff ? | 1 / 2-20 / 21-50 / 51-100 / 101-500 / 500+ |
| Contact's job function ? | Decision-maker / Not decision-maker |
| Already created a specification for the work ? | Yes / Soon / No |
| Implementation budget ? | Unknown / <100k / 101-300k / >300k |
For instance, a sales person specializing in large accounts for the service sector could have a profile defined like this:
- Budget for integration:
Unknown,100k-300kor>300k. - Already created a specification for the work?
Yes,No. - Industry Sector?
Services.
When entering the details of a specific prospect, the prospect's answers to various questions can be entered in the Profiling tab of the Customer form. All you have to do is click the Use a Questionnaire button on the Profiling tab of the Customer form.
Odoo ERPOnline will automatically assign prospects to the appropriate partner category based on these answers.
Customers corresponding to a specific search profile can be treated as a priority. The sales person can access the profile of the large active accounts easily.