
From Repair to Invoicing and Stock Movements
The management of repairs is carried out through the module mrp_repair. Once installed, this module adds a new Manufacturing > Manufacturing > Repair Orders menu under the Manufacturing menu to create repair jobs and review repairs in progress.
To install this module, Go to menu menu Settings > Configuration > Manufacturing in Order, tick Manage repairs of products.
In Odoo ERPOnline, a repair will have the following effects:
- Use of materials: items for replacement,
- Production of products: items replaced from reserved stock,
- Quality control: tracking the reasons for repair,
- Accounting entries: following stock moves,
- Receipt and delivery of product from and to the end user,
- Adding operations that can be seen in the product's traceability,
- Invoicing items used and/or free for repairs.
Entering Data for a New Repair
Use the menu Manufacturing > Manufacturing > Repair Orders to enter a new repair into the system. You will see a blank form for the repair data, as shown in the figure Entering a New Repair below.
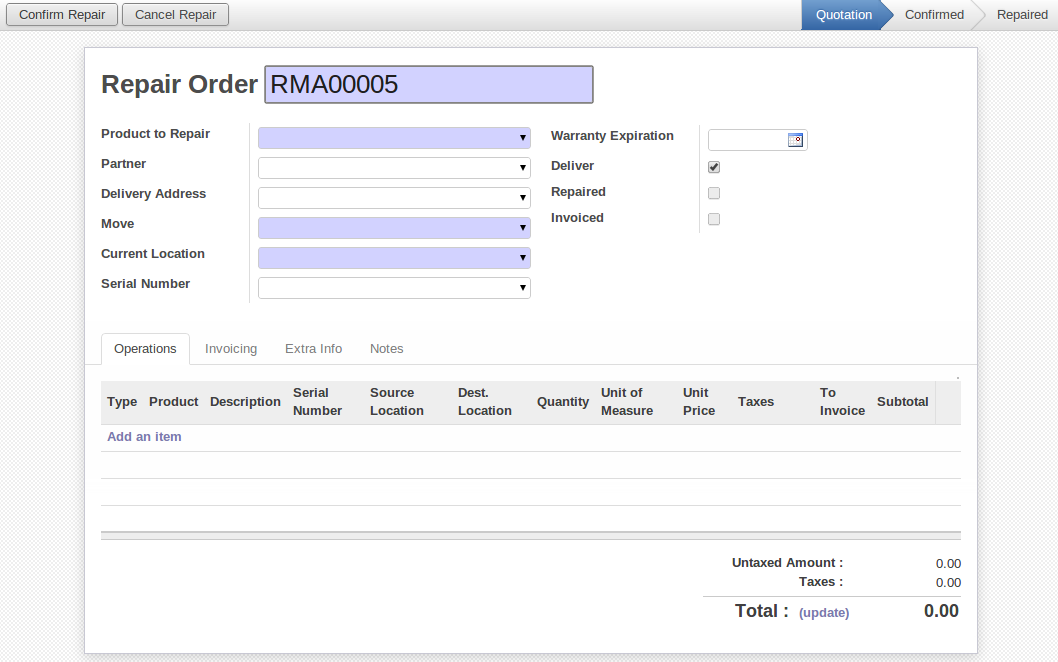
Entering a New Repair
First enter the product to repair, then identify the product that will be repaired using the product serial number. Odoo ERPOnline then automatically completes fields from the selected serial number – the partner fields, address, delivery location and stock move.
If a warranty period has been defined in the product description, in months, Odoo ERPOnline completes the field Guarantee limit with the correct warranty date.
Now you have to specify the components that you will be adding, replacing or removing in the Operations part. On each line, you should specify the following:
Add or remove a component of the finished product:
- Product,
- Qty,
- UoM,
- Unit Price,
- To Invoice or not.
Once the component has been selected, Odoo ERPOnline automatically completes most of the fields:
Qty: 1,UoM: unit for managing stock defined in the product form,Unit Price: calculated from the customer list price,Source Location: given by the stock management,To Invoice: depends on the actual date and the guarantee period.
This information is automatically proposed by the system, but you can modify it all yourself.
On the second tab of the Repair form, Invoicing, you can select whether the repair has to be invoiced or not, and if invoiced whether it should be before or after the repair. You can also select the applicable list price, a specific address and encode additional charges that need to be added to the repair invoice.
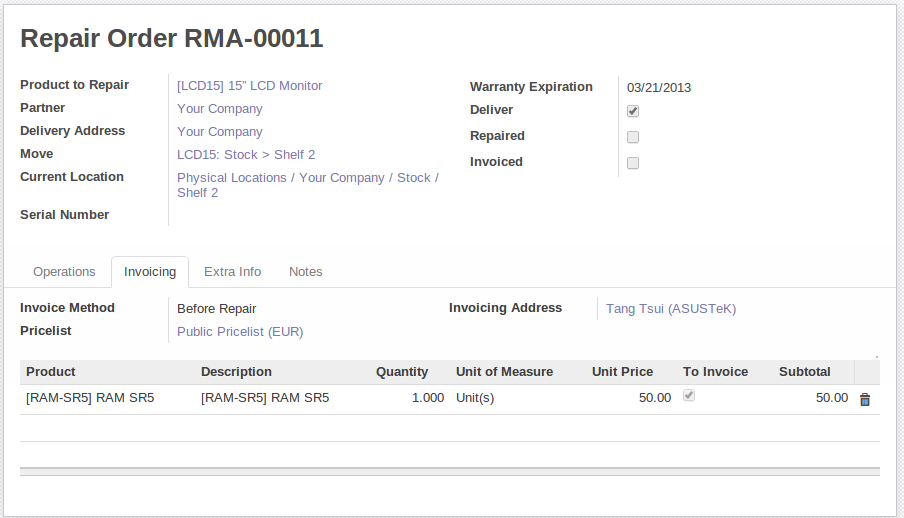
Repair Form, Invoicing Tab
The third tab, Extra Info shows information about linked invoice and picking. You receive information about the current location, and you can change the Delivery Location. The Notes tab allows you to register internal notes and information that should be written on the Quotation.
Repair Workflow
A defined process handles a repair order – both the repair itself and the customer invoicing. The figure Process to Handle a Repair shows this repair process.
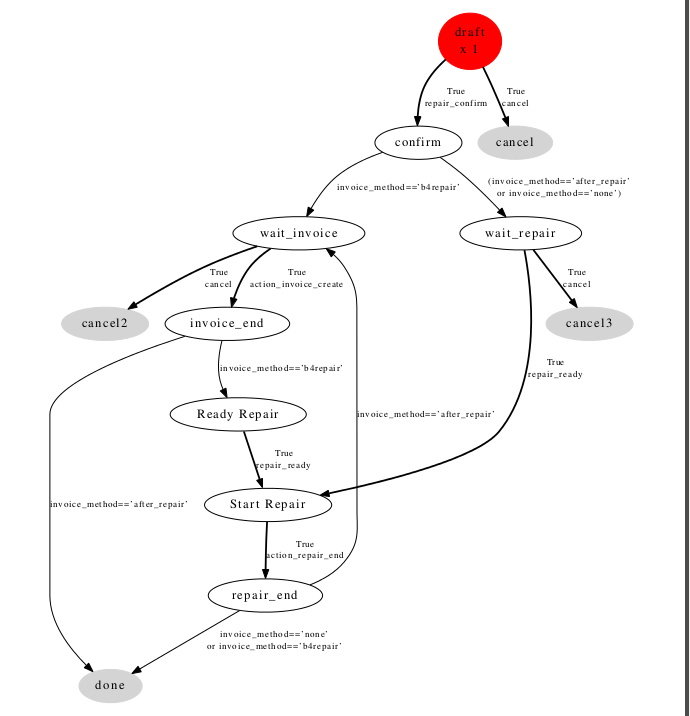
Process to Handle a Repair
Once a repair has been entered in the system, it is in the Quotation state. In this state, a repair order has no impact on the rest of the system. You can print a quotation through the action Quotation / Order.
On the second tab, you can specify the Invoice Method:
- No Invoice,
- Before Repair,
- After Repair.
You can then confirm the repair operation or create an invoice for the customer depending on the Invoice Method.
The repair quotation can now be sent to the customer. Once the customer approves the repair, click the Confirm Repair button. From the menu Manufacturing > Manufacturing > Repair Orders you can easily find the confirmed repair orders by selecting the Confirmed filter. Click Start Repair to indicate that you can start working on the repair. The Repair order will now be in the Under Repair state. When you finish the repair, click the End Repair button.
Invoicing the Repair
When the repair is to be invoiced, a draft invoice is generated by the system. For an After Repair invoice, you can Select the repair record from the list and click the Make Invoice from More button. Odoo ERPOnline will then show the draft invoice created at the top of the repair order. This invoice contains the raw materials used (replaced components) and any other costs such as the time used for the repair. These other costs are entered on the second tab of the Repair form. Any information you entered for the quotation on the Notes tab will also be displayed on the invoice.
If the product to be repaired is still under guarantee, Odoo ERPOnline automatically suggests that the components themselves are not invoiced, but will still use any other defined costs. You can override any of these default values while entering the data.
The link to the generated invoice is shown on the Extra Info tab of the repair document. To open the invoice, simply click the Invoice field.
Stock Movements and Repairs
When the repair has been carried out, Odoo ERPOnline automatically carries out stock movements for components that have been removed, added or replaced on the finished product. From the menu Warehouse > Traceability > Stock Moves, you can for instance enter the production serial number to see all moves for the repaired product.
The move operations are carried out using the locations shown in the first tab of the Repair form. If a destination location has been specified, Odoo ERPOnline automatically handles the final customer delivery order when the repair has been completed. This also lets you manage the delivery of the repaired products.
For example, take the case of the shelf that was produced at the start of this chapter. If you have to replace the shelf SIDEPAN, you should enter data for the repair as shown in figure Repair for a Side Panel.
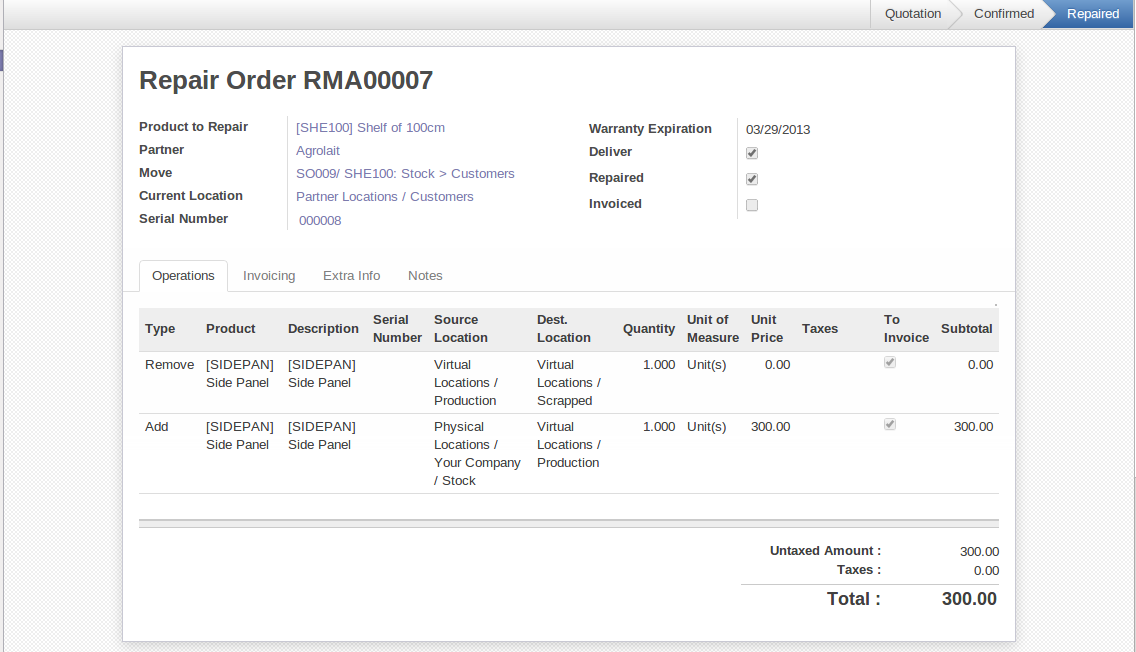
Repair for a Side Panel
In this example, you would carry out the following operations:
- Remove a SIDEPAN shelf in the cabinet and put the faulty shelf in the
Scrappedlocation, - Place a new SIDEPAN shelf that has been taken from stock.
When the repair is ready to be confirmed, Odoo ERPOnline will generate the following stock moves:
- Put faulty SIDEPAN into suitable stock location
Default Production > Scrapped, - Consume SIDEPAN:
Stock > Production.
If you analyze the traceability of this lot number, you will see all the repair operations in the upstream and downstream traceability lists of the products concerned.