
Managing Customer Acquisition
What is the difference between a partner (company) and a contact in Odoo ERPOnline? A Partner represents an entity that you do business with - a customer, a prospect, or even an employee of your company. In other CRM applications, a partner (company) is also referred to as an Account. A Contact represents a person who works for a partner.
Each partner can have an unlimited number of contacts. Odoo ERPOnline also allows you to have several contacts with the same address type for one partner. You can easily link several Invoice addresses to a customer, for instance.
Address Types
If you have recorded several contacts for the same partner (company), you can tell Odoo ERPOnline which contact will be used in various documents (e.g. a quotation) by specifying the Address Type.
For example, a partner (company) can have a delivery address that differs from the company's invoice address. If the Address Types are correctly assigned, Odoo ERPOnline can automatically select the appropriate address during the creation of the document – an invoice is addressed to the contact that has been assigned the Address Type of Invoice, otherwise to the Default address.
The concept of a partner in Odoo ERPOnline is much more flexible than in many other management applications. Why is that? Because a partner can be your supplier and your customer at the same time. As a consequence, any data you update for that partner will apply to both customer and supplier! Thanks to this, you no longer need to update your customer/supplier information several times (or even in several places) for the same partner.
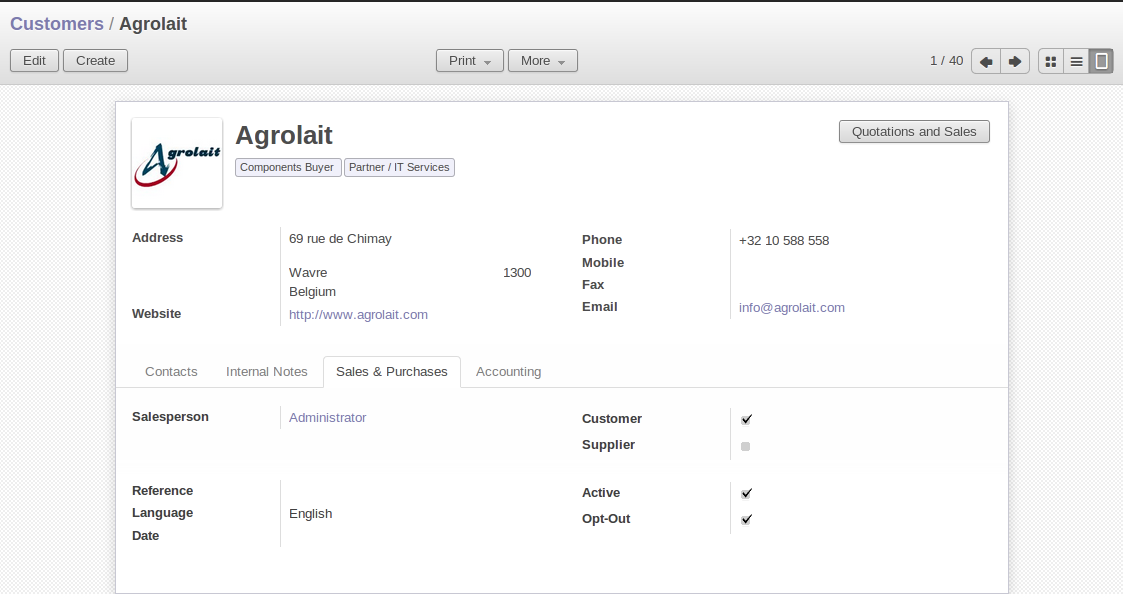
The partner form contains information about the company, such as its corporate name, its postal information, its communication information, its website and the categories the partner belongs to. The partner form is composed of several tabs.
- The Contact tab contains information about different contacts of that partner (
company). - The
Internal Notestab is an area for free text notes. - The
Sales & Purchasestab contains information such as the default salesperson and sales team, whether the partner (company) is a Customer and/or a Supplier and its primary language. - The
Accoutingtab contains information about Fiscal Position,Account Payable/Receivable,Credit Limit,etc..
The Sales & Purchases of a Customer
Creating and Updating Partners
Before explaining you how to create a partner, just a quick word on the different ways of representing partners in OpenERP. Kanban view shows a global overview of customers (the default representation when you click the Customers menu). List view shows a list of customers. In this view, you can see several customers at a time. Form view is displayed when you click a specific customer to start editing or when you create a new customer.
To create a new partner (a company, customer, supplier, ...) use the menu Sales > Customers(for customers) or the menu Purchases > Suppliers (for suppliers). These menus does not only allow you to create a new partner, but also to search for partners.

A Customer Form
Mandatory
Blue fields are always mandatory, meaning that you have to enter a value there. It is impossible to save changes as long as a blue field is not completed.
You should at least enter the company's Name in the partner form. Some fields are text fields, other fields may be linked to existing data that have been entered elsewhere, such as Countries.
Create a customer with the following data:
Name: Smith and Offspring.Customer checkbox: checked, in the Sales & Purchases tab.Supplier checkbox: unchecked, in the Sales & Purchases tab.Contact Name: Stephen Smith, in the Contacts tab.Type: Default.Savethe form.
If you use the email gateway, the Outlook or the Thunderbird plugin, do not forget to register an email addresses to each contact.
To update a partner, open the corresponding form, select Edit and change the required fields. As explained before, when a company is both one of your customers and a supplier, you just have to edit the partner form once to have changes applied to both customer and supplier.
Checkboxes
Why is it important for you to correctly set the Customer and Supplier checkboxes in the partner form? These checkboxes are designed to enable Odoo ERPOnline to quickly select the partners who should be displayed in some drop-down boxes. An example: when you select a partner in a Sales Quotation, Odoo ERPOnline will only allow you to select from the list of Customers. And that is precisely what the Customer checkbox is used for.
Managing your Contacts
You can have several contacts for one partner. Contacts represent company employees that you are in touch with, along with their address details. For each address you can indicate the type (Default, Invoice, Delivery, Contact or Other).
Contacts can be entered into the Contacts tab of the Customer form. Or you can also create a new partner and assign a company on that partner which will make this partner as a contact on that partner (company).
Customizing Partner Fields
Odoo ERPOnline also allows you to customize the Partner view to your needs. Click the Manage Views option if you want to add fields, delete fields or change the order of fields in a view.
Let us add the Birthday field to a contact, in the Customers form view. To do so, click on the logged in user at top-right and select About Odoo and then select Activate the developer mode.Now go to the Sales > Sales > Customers menu and open any customer in Form view. Click on Debug View# and then select Manage Views, then Edit because the corresponding view will already be preselected.
Go to the last line of the view and click the blue plus (+) sign to add a field to the Contacts view. Proceed as in the figure below, then click the Update button.
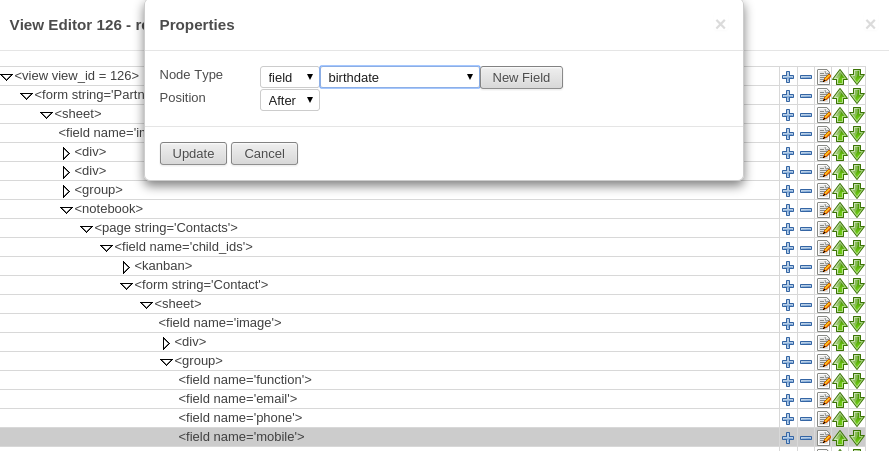
Add the Birthday Field for a Contact
In the Properties screen that appears, click on the New Field through which you can change the label to Birthday in the String field. To indicate that a new field can be used in the corresponding search view, make sure to select Always Searchable. Click the Update button to confirm your changes. Click Preview to see your result. The Birthday field will now appear in your Customers form view --> Contacts tab --> Create/Open any contact, ready to be used. You can also customize the actions.
Performing Actions on Customers
At the right side of the Customers form view, you will find button(Quotations and Sales). You can perform actions(by clicking on the More at the top) and print reports(by clicking on the Print at the top) both from List and from Form view, List view allowing you to do actions for several partners at the same time. You can also add an attachment.
Actions
To display the list of possible actions, just select one or more customers.
You can create a new opportunity for a customer, or start a mass mailing. Mass mailings will usually be started from list view, because you will select several partners at a time.
Campaigns
For mass mailings, you might prefer to use the Direct Marketing application, which offers great functionalities (please refer to chapter Driving your Marketing Campaigns).
Finding your Partners using Filters
Open the Customers list view to discover the search options(top-right) allowing you to easily filter your partners.You can group by Salesman to see which customers have already been assigned a salesman or not.And can also group by Company. You can filter by Persons to see the customers you are responsible for. You can also filter by My Partners, Companies, Customers and Suppliers.
Limit
If you want to display more than 80 partners displayed by default, click the1 to 80 of 80 option at the top of the screen to be able to change the limit.
Filters also allow you to quickly set lists of customers for which you want to do specific actions. Through the New Filter option, you can also add your own filters for any field related to the Customer form.
Filters
You can easily create your own frequently used filters by prefiltering the data the way you want and then using the Save Filter option.
Categorizing your Partners
Odoo ERPOnline uses categories to organize all of its partners according to their relationship with your company (partner, prospect, supplier, and so on). Each partner may be attached to several categories. To open the list of available partner categories, use the menu Sales > Configuration > Address Book > Partner Tags.
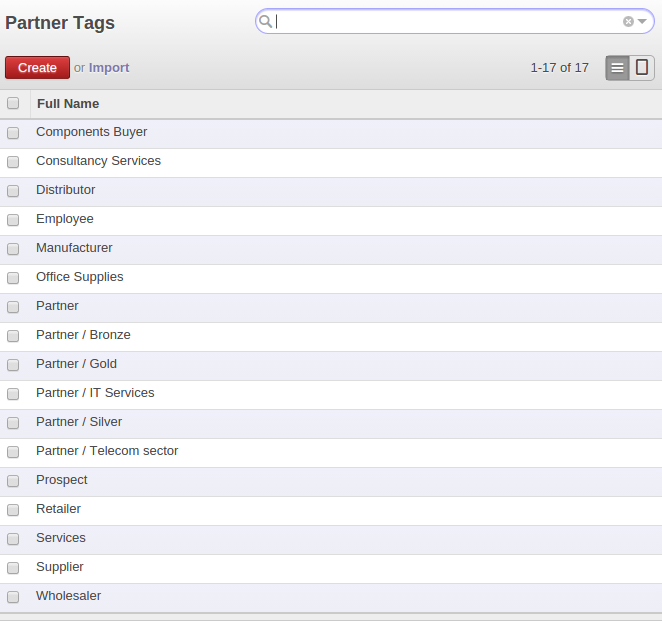
List of Partner Tags
Categories
To create a new category, go to the menu Sales > Configuration > Address Book > Partner Tags and click the Create button.
Because categories can be organized according to a tree structure, you can apply an action at any level of the structure: a marketing promotion activity, for example, can be applied either to all customers, or selectively only to customers in one category and its subcategories.
You can create your own categories and assign them to your partner from the Customer form.